Natural Easter Egg Dye
This homemade Easter Egg Dye is an easy way to naturally dye Easter eggs with real food! This quick and easy recipe creates vibrant colors with no chemicals or dyes!
Ingredients
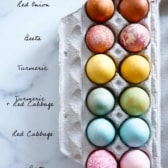
- Beets red/pink/brown: 1 large beet, diced + 2 cups water
- Red Cabbage blue: ½ red cabbage, sliced + 2 cups water
- Red Onion Skins deep orange/brown: skins from 4 large onions + 2 cups water
- Turmeric yellow: ¼ cup sliced fresh turmeric or 2 tablespoons dried turmeric + 2 cups water
- More Natural Color Suggestions
- Blueberries grey/blue: 2 cups frozen blueberries + 2 cups water (don’t boil this one. Just let it steep!)
- Carrots orange/yellow: 3 large carrots, sliced + 2 cups water
- Spinach or Parsley green: 2 cups spinach or 1 bunch parsley + 2 cups water
- Yellow Onion Skins orange: skins from 4 large onions + 2 cups water
- Coffee brown: 2 cups strong brewed coffee
Instructions
- Boil the eggs: Use the water boiling or steaming method to hard-boil your eggs before coloring. Make sure they are completely cooled before you dye them! We recommend using the water boiling or steaming method. Check out this post here. We normally love the Instant Pot for steaming eggs, but not here. We don't recommend using the Instant Pot for colored eggs because they are more likely to crack in the food coloring. Again, let the eggs cool completely before coloring.
- Boil the food item: Place 2 cups of water into a pan along with the food item of your choice. Bring the mixture to a boil, then let it simmer for 20 minutes. Strain and cool completely.
- Add vinegar: Once the dyed water is cool, add 2 teaspoons of vinegar.
- Soak: Gently drop the cooked and cooled eggs into the natural Easter egg dye so they are completely submerged. Let the eggs soak overnight in the fridge. The longer they sit, the more brilliant the color will be!
- Dip again (optional): If you want to dip the egg again to get a darker hue or to create another color, now’s the time.
- Dry: Place a clean kitchen towel down on the counter. Pull the eggs out of the dye and place them on the towel. Let them air dry. When you are ready to take the eggs out of the color, place a clean kitchen towel down and gently pull out the eggs and place on the towel, or you could place them on a wire rack to prevent and the towel from wiping off any of the color. Let it air dry, do not rub it. If you'd like to dip the egg again to get a darker hue do that once it has dried. In addition, if you want to combine colors to make different hues (think coloring an egg first yellow, then blue=green) now is the time to do it.
- Once completely dry: You can gently rub it with oil to help prevent the color from changing. We found that some of the eggs changed colors over a few days time (especially the beet one). Do them the day before Easter if you'd like them to be as close to the color as you want as possible.
- Store: Dyed Easter eggs will last in the fridge for 4-5 days. Keep in mind their color can change as they sit. Don’t worry, though. They taste the same on the inside!
Notes
- Submerge completely. Make sure the eggs are entirely covered by the dye so they’re completely colored.
- Keep them in the fridge. The eggs can over-cook in the natural dye, so make sure you keep them in the fridge as they sit.
- Air dry! Don’t rub the eggs to dry them. This can smudge off the color.
- Keep in mind the stored eggs change color over time. If you’d like them to be as close to the original color as possible, dye them the day before Easter.