
This post may contain affiliate links. Please read my disclosure policy.
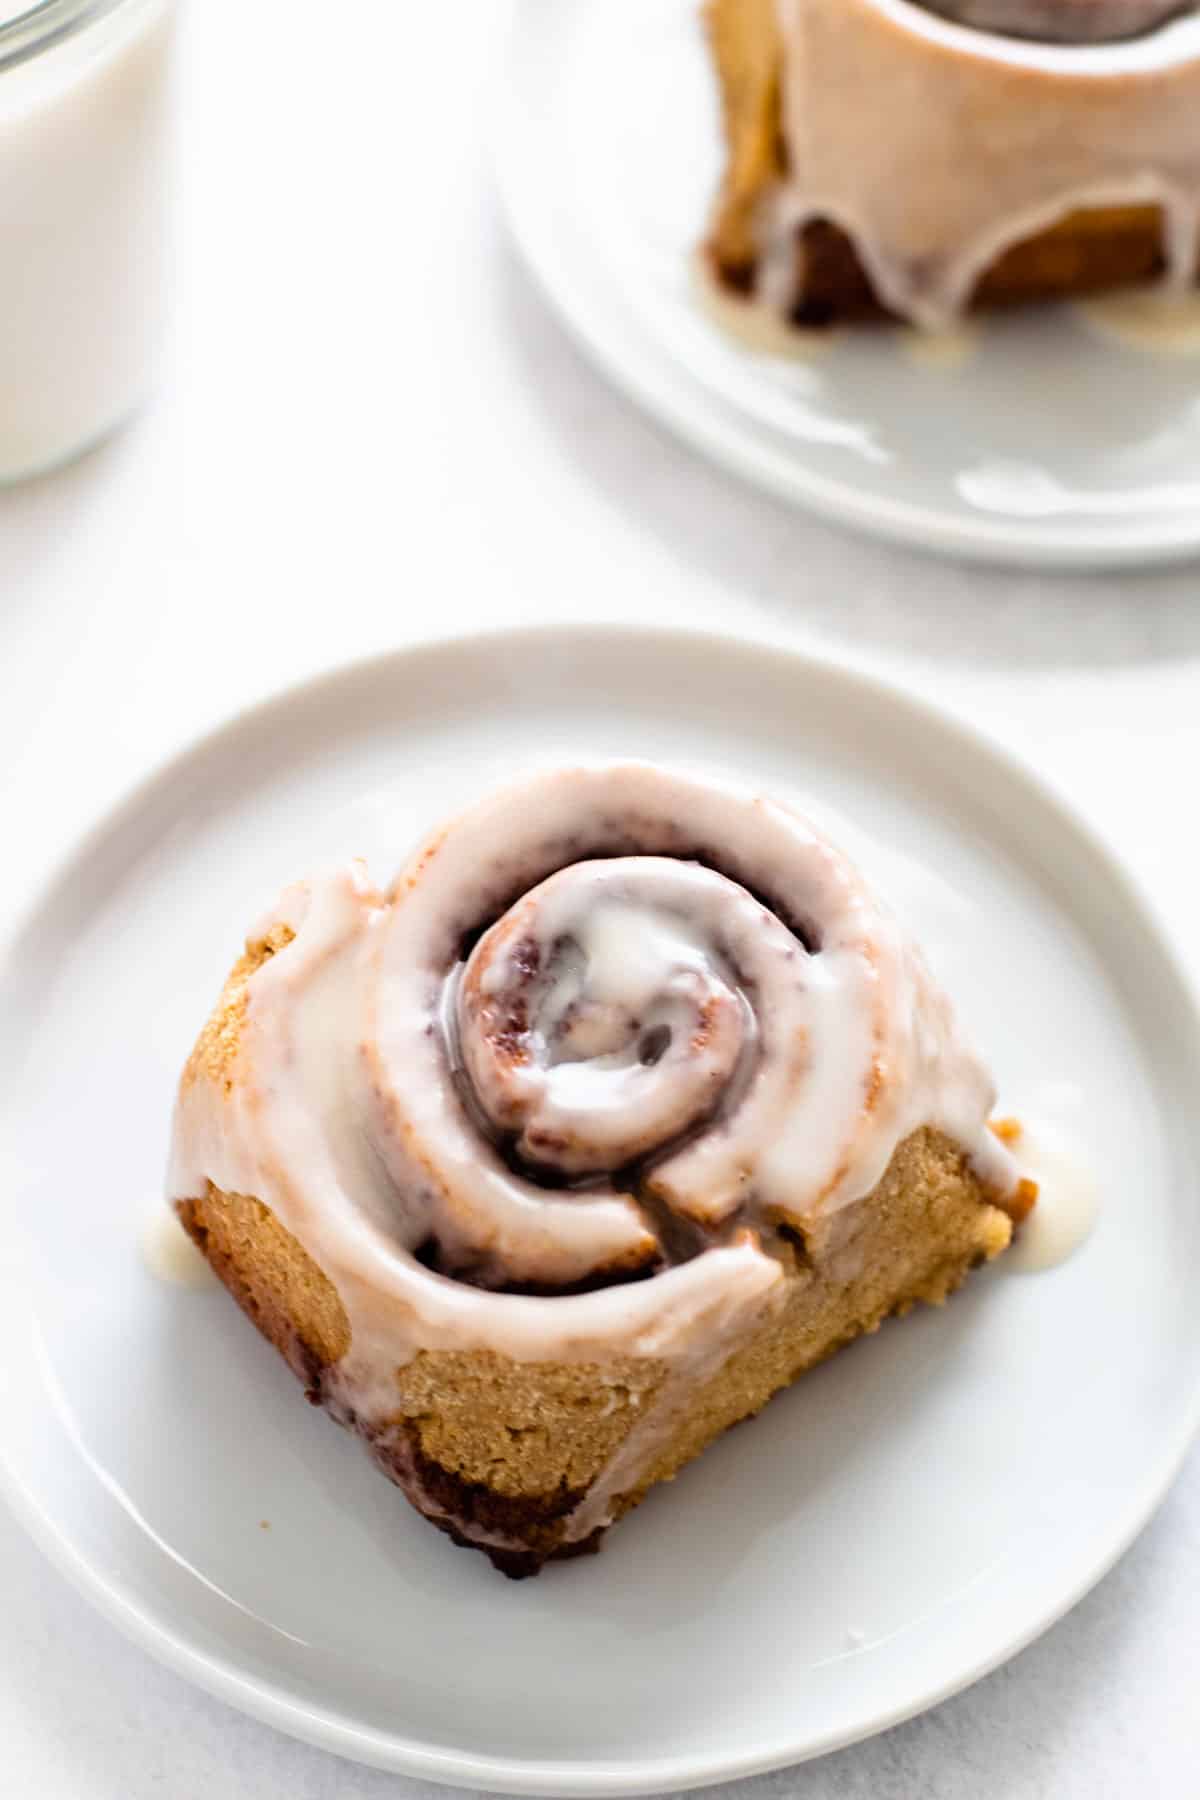
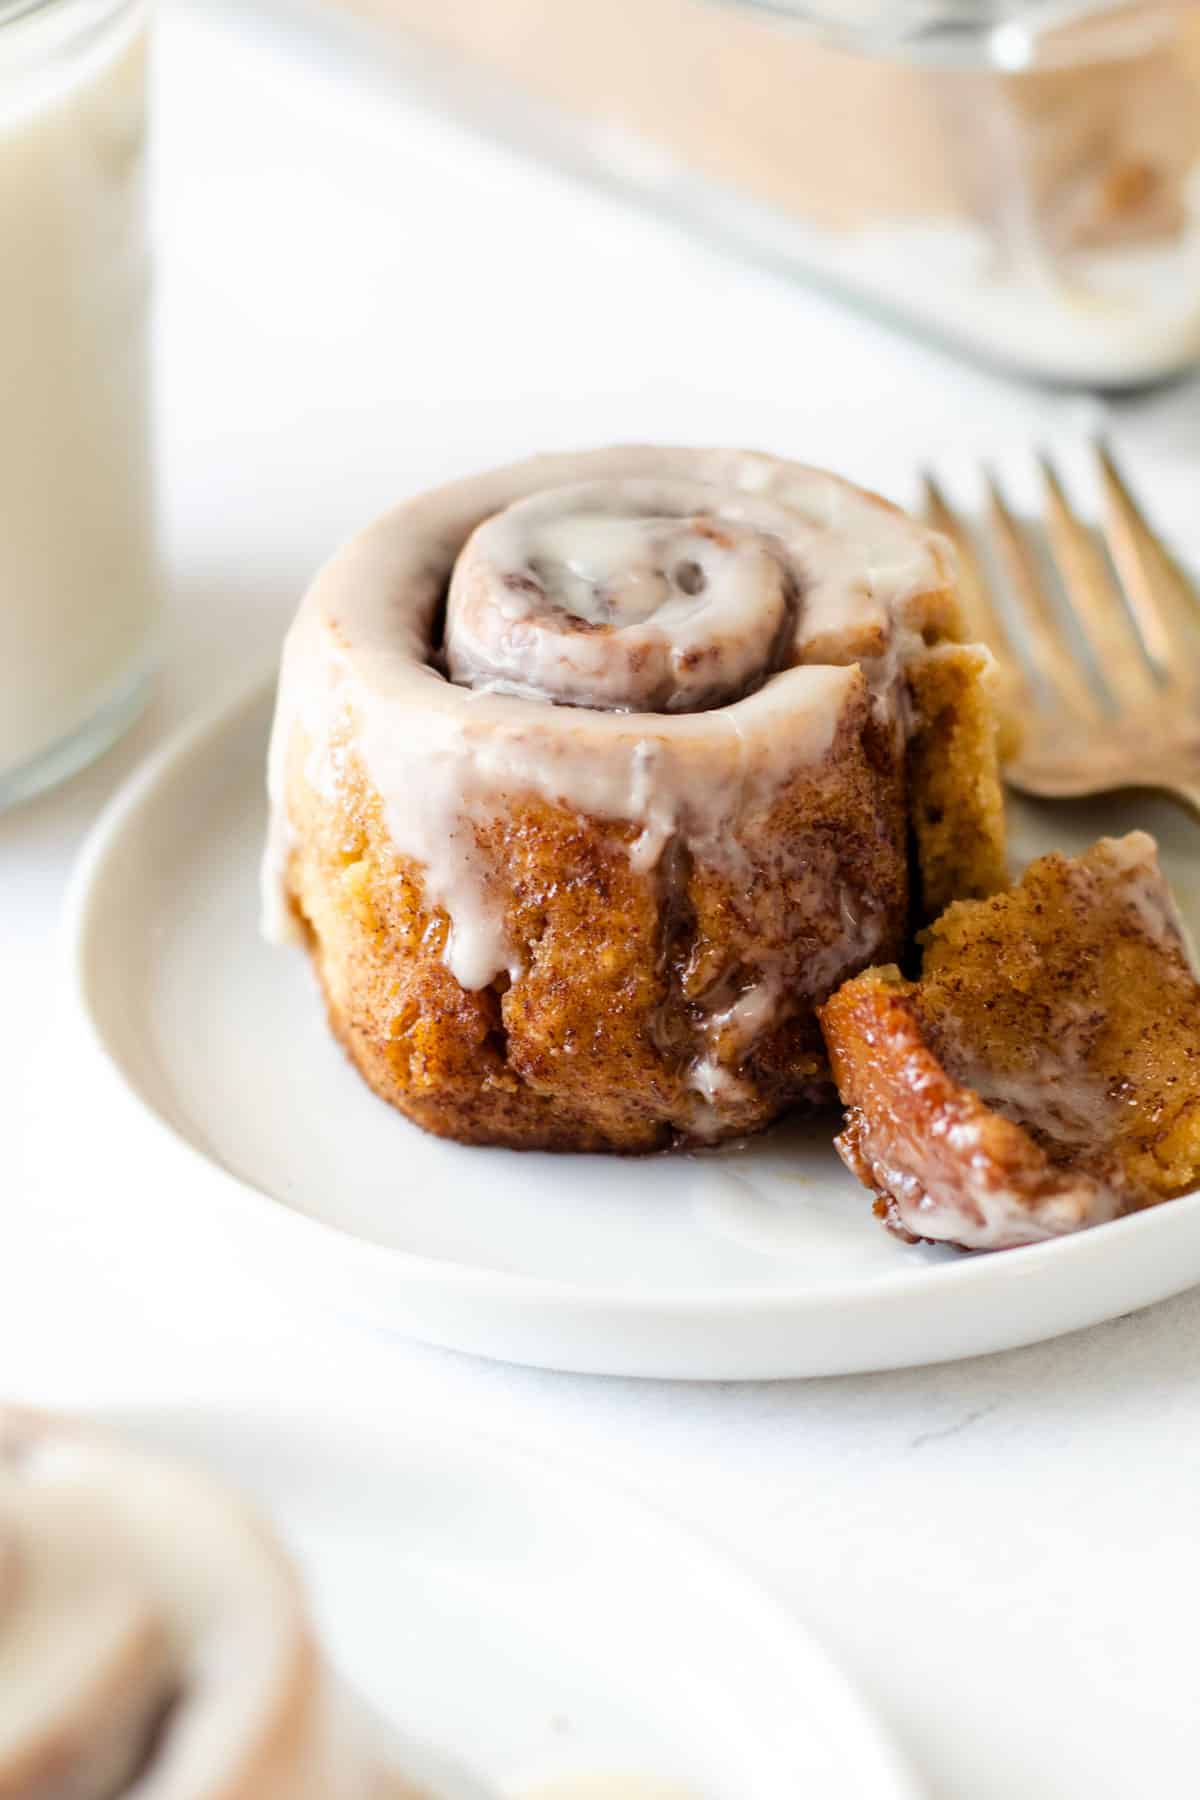
The ultimate comfort food anytime of year, these Gluten Free Cinnamon Rolls are made using primarily oat flour and coconut flour. The gluten-free dough is surprisingly easy to work with, and doesn’t require a double rise which means you can have fresh cinnamon rolls from start to finish in less than two hours.

Oat Flour Cinnamon Rolls
These gluten-free cinnamon rolls are a unique recipe that utilizes oat flour, coconut flour and tapioca flour to create a wholesome and sweet yeasted roll. These rolls have a soft texture, with a nice whole grain bite to them, and that classic cinnamon-flavored sweet swirl throughout. These rolls are not only gluten-free, but they’re also nut-free too!
Do They Taste Like Regular Cinnamon Rolls?
Nope! Because these cinnamon rolls are made with oat and coconut flour. You just can’t replicate gluten cinnamon rolls with gluten-free flours exactly, simply because traditional cinnamon rolls rely on that gluten for many reasons. Instead, this recipe is a wholesome gluten-free alternative that has a nice bite to it, while still being tender, and of course a warm cinnamon flavor and vanilla glaze.
The Background Story of these Unique Gluten-Free Cinnamon Rolls
These gluten-free cinnamon rolls are over 6 months in the making. This recipe took more than 40 tests to get them just where we wanted them to be! In the end, we wanted cinnamon rolls that didn’t rely on a gluten-free flour blend, but instead used a mix of wholesome whole grain flours that we typically keep in our pantry. In the end, we relied heavily on our newest favorite gluten-free flour: oat flour! Oat flour doesn’t replicate wheat flour exactly (nothing will!) but instead, it lends itself to create baked goods that have a nice texture and flavor to them, while also adding in some nutritious fiber.
Once we decided we wanted to work with oat flour, we knew we needed to add in some additional flours to get the texture we were going for. We settled on adding in coconut flour, before realizing we needed to add in one other flour that would mimic some of the properties that wheat flour gave to a cinnamon roll. Tapioca flour is something we always turn to get the right texture we need.
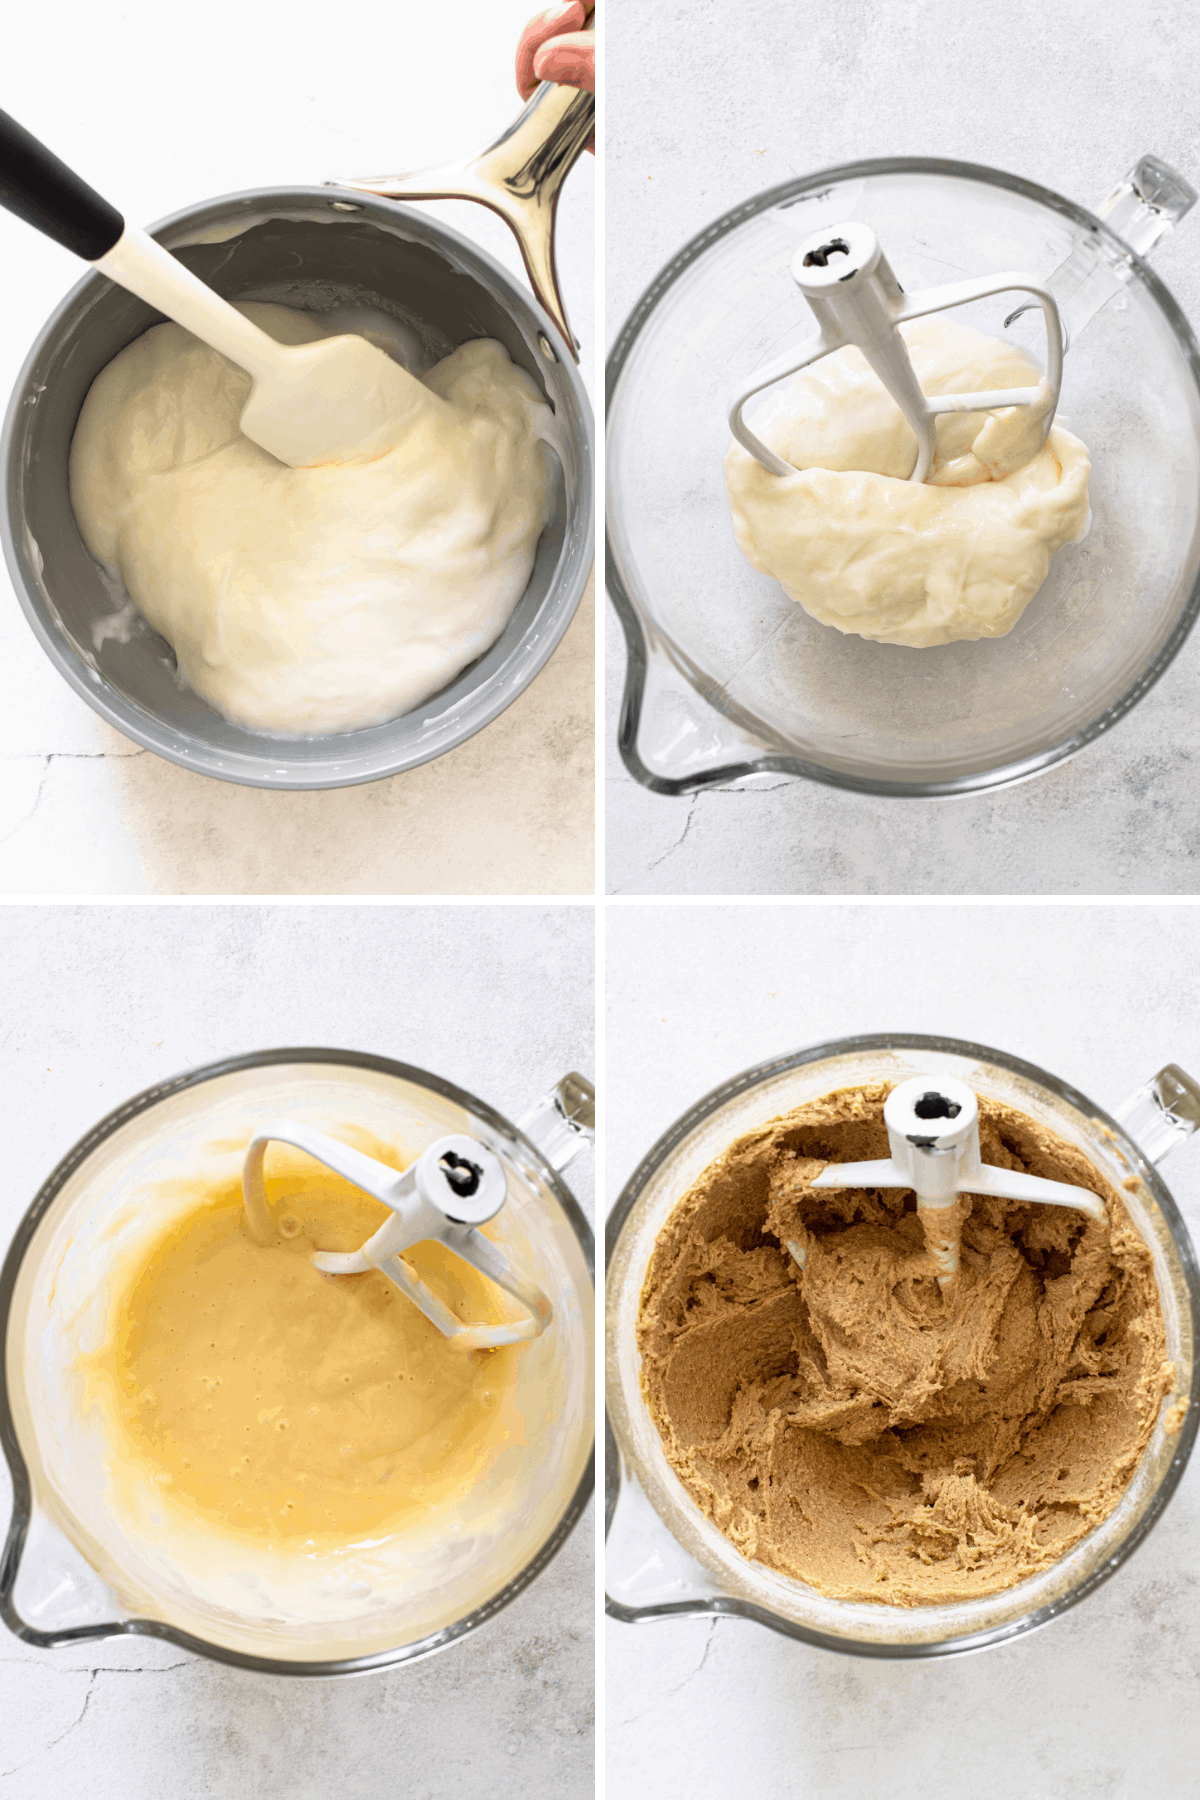
In the end, we were struggling with the cinnamon roll dough being tricky to work with. It was either too wet and we couldn’t easily form the dough into rolls, or it was dry and easy to work but baked up dry. So we turned to an unusual baking technique of making a “twice-cooked” dough. We partially cook some of the tapioca flour with the milk on the stovetop. Doing so pre-cooks the starch so it absorbs the milk and turns it into a very sticky ball of dough. That sticky ball of dough is then mixed together with the remaining dough which allows the proper amount of hydration to be added into the dough while still having it be easy to work with.
So while this cinnamon roll recipe uses some unique baking methods to get the end result, we really invite you to lean into it and have fun making these homemade gluten-free cinnamon rolls.
Ingredients Needed for Gluten-Free Cinnamon Rolls
- Oat Flour
- Coconut Flour
- Tapioca Flour
- Coconut Sugar
- Instant Rapid Rise Yeast
- Milk
- Eggs
- Butter
- Cinnamon
- Vanilla
- Powdered Sugar
- Baking Powder
- Salt
Substitutions
We’ll just start this off by saying this took over 40 tests to make. There isn’t a ton of room for substitutions and we can’t recommend anything other than the ones we state below and expect to get the same results.
Flours: We can’t recommend changing any of the flours at all. If you do experiment, let us know how it goes. You can make your own oat flour if you need to.
Milk: We hardly ever call for traditional milk in our recipes, but for the best results for this recipe, use whole cow’s milk. We have tested this with oat milk, and got similar results, though the dough doesn’t rise quite as much. So if you really needed to make this dairy-free, we recommend oat milk. It isn’t a huge difference, but we did notice it. We have not tested this with any other milk besides cow’s milk and oat milk.
Instant Rapid Rise Yeast: You must use this yeast. It has to be instant and rapid rise yeast in order to get the best result. This recipe dives deeper into the proofing and yeast needed below.
Eggs: We have not tested an egg alternative for this recipe. If you do, let us know how it goes.
Coconut Sugar: We haven’t tested it, but likely light brown sugar will work just fine.
Butter: We haven’t tested it with vegan butter, but believe it will work just fine.
How to Make the Dough
This dough is a “twice-cooked” dough, meaning part of it is cooked initially on the stovetop, before getting fully baked again in the oven.
Tapioca starch is heated together with milk on the stove until it turns into a thick, sticky ball. I’ve found using a non-stick pan here is helpful since the mixture is so sticky.
Then, that mixture is transferred to a stand mixer and the rest of the ingredients are slowly mixed in. It’s a relatively simple process, with only one small caveat. The sticky tapioca mixture needs to cool for a few minutes to make sure that the eggs don’t get cooked when they get added in. The recipe calls for letting it cool for a few minutes, then mixing it at low speed to let some of that steam and heat escape.
After it’s slightly cooled, the eggs are added in one at a time. It might seem at first that the eggs aren’t going to incorporate, but they will! Just make sure to wait until they’re fully incorporated until you add the next one. After that, a bit of butter is added in and mixed in similarly until incorporated.
Finally, the dry ingredients are mixed in. Make sure you scrape down the bowl once or twice during this process to ensure everything is fully incorporated.
In the end, your dough should be a thick, sticky batter.
Tips for working with Sticky Tapioca
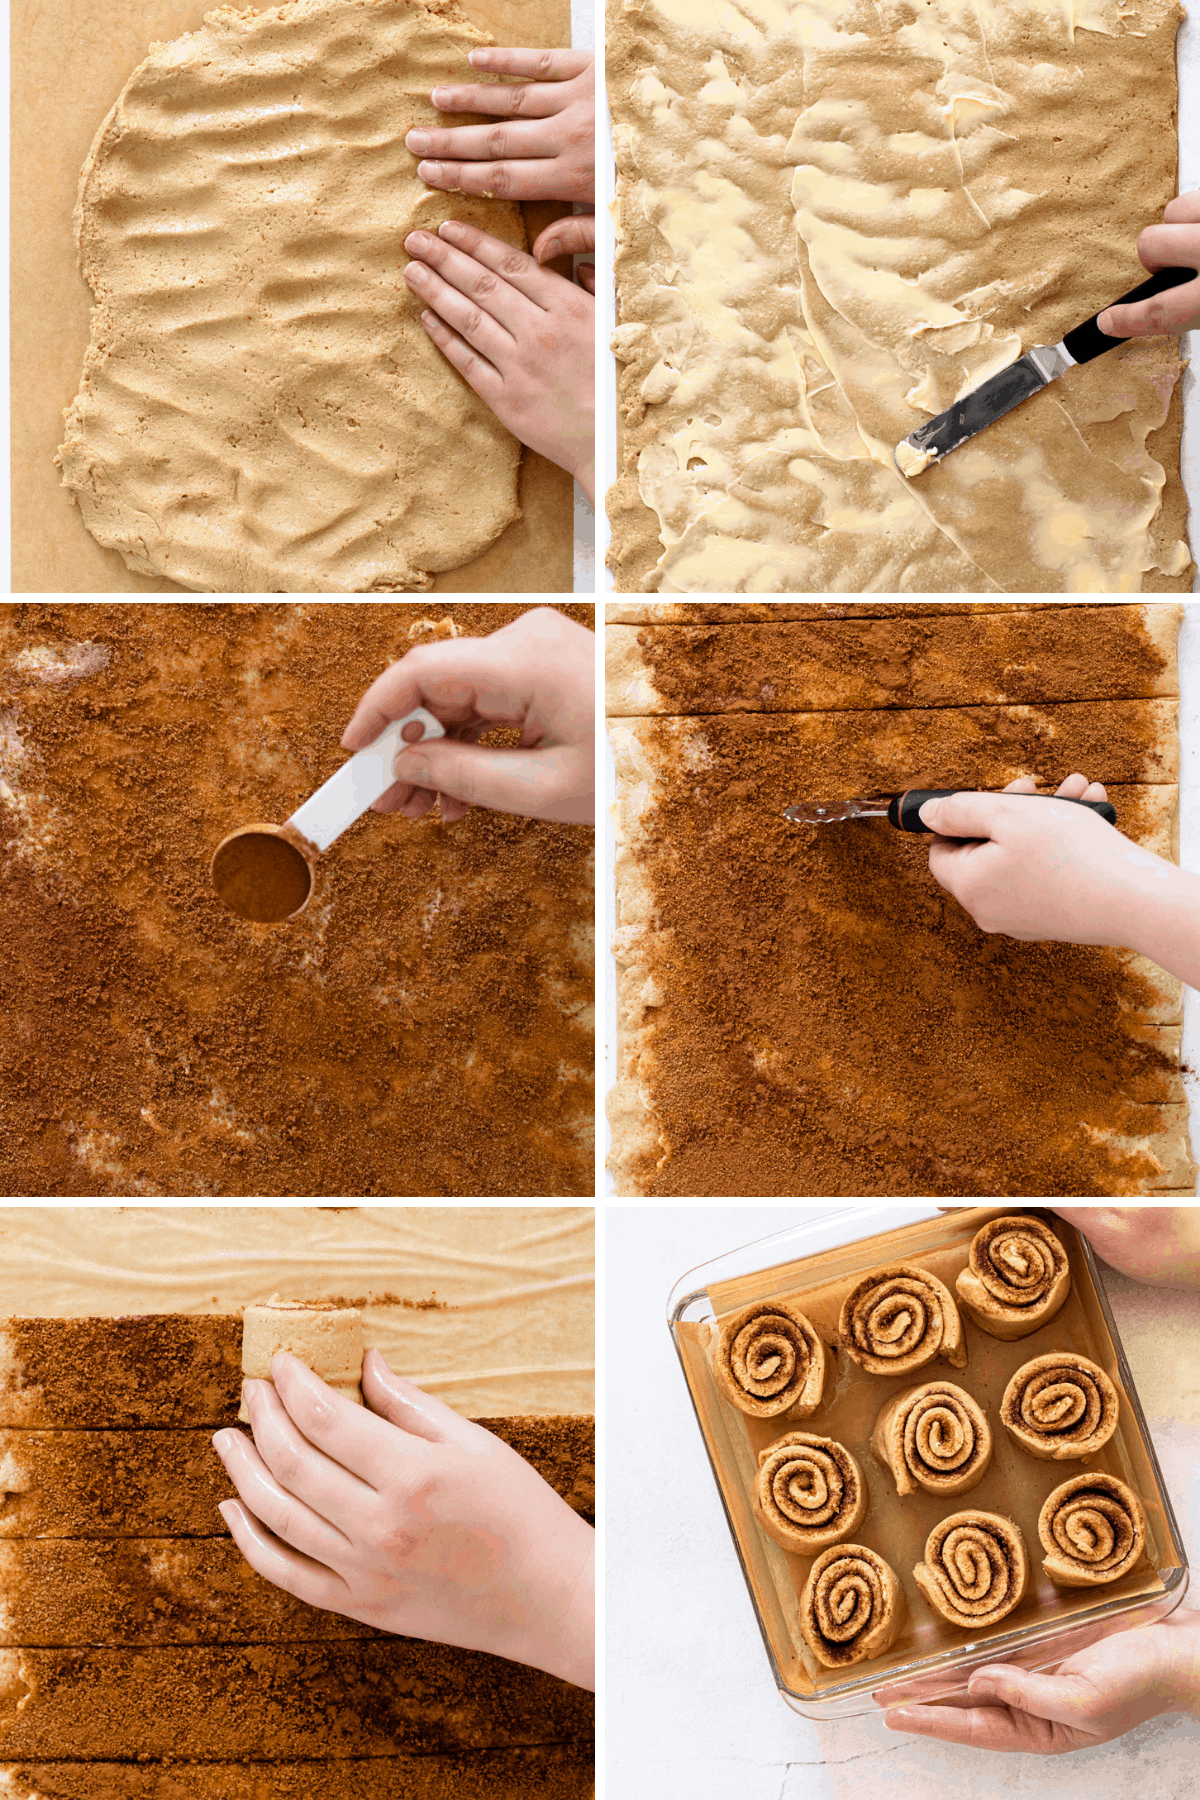
There is no doubt, this dough is sticky. However, one simple trick will save it from sticking to everything: oil. I recommend using a baking spray, and spraying down everything, from your spatula, to your work-surface, to your hands. We like this Avocado Oil Spray, and it’s what we used because it has only one ingredient in it and no aerosols.
When in doubt, oil it.
I’ve also found that if my hands ever started to stick to the dough, I’d start over with clean hands and fresh oil on them. So when rolling the cinnamon rolls, if for any reason the dough starts to stick, stop to wash and dry your hands and re-oil them. That prevents any mishaps of sticking dough, which can ruin that beautiful spiral shape of the cinnamon roll.
Filling and Rolling the Oat Flour Cinnamon Rolls
As noted above, oil is the trick to working with this sticky dough. Oil makes the dough magically easy to work with, so I keep my can of avocado spray that I use for nearly everything right by me.
Once you’ve learned that trick, working with this dough is simple. Transfer the dough from the mixer to a well-oiled piece of parchment. It’s helpful to cut the parchment the size you need to pat out the dough (which is 12×16), that way you don’t need to measure the rectangle. Then pat out the dough, taking care to make sure the dough is an even thickness.
Next, spread the butter onto the dough and sprinkle it with cinnamon and sugar. Then, cut the dough using a pastry wheel or a knife into approximately nine vertical strips about 1-3/4″ each wide on the long side of the dough.
Finally, with clean and well-oiled hands, one-by-one roll the cinnamon rolls up and transfer them to the parchment-lined square baking sheet.
Proofing Gluten-Free Dough
Forget what you think you know about yeast when it comes to gluten-free baking. Working with gluten-free yeasted dough can’t be compared to regular wheat dough because you are missing one important structure in wheat recipes: the gluten! This recipe was specifically formulated to work with oat and coconut flour. Tapioca is the third flour that was added in to act as the “gluten” of the recipe. Tapioca helps to form the structure of this recipe, and to help give that chewy texture.
In many ways, working with this gluten-free dough is much simpler because you only need to let the dough rise once. This recipe was tested a few times with a double rise and it actually made the dough fall apart and the structure couldn’t hold together. So just one rise is all that is needed to help leaven the whole grain gluten-free flours.
It’s also important to use the correct type of yeast here. This recipe calls for Instant Rapid Rise yeast. This type of yeast does not need to be activated and it gives the dough a rapid rise which is crucial with this blend of gluten-free flour. This yeast cannot be swapped with another type of yeast.
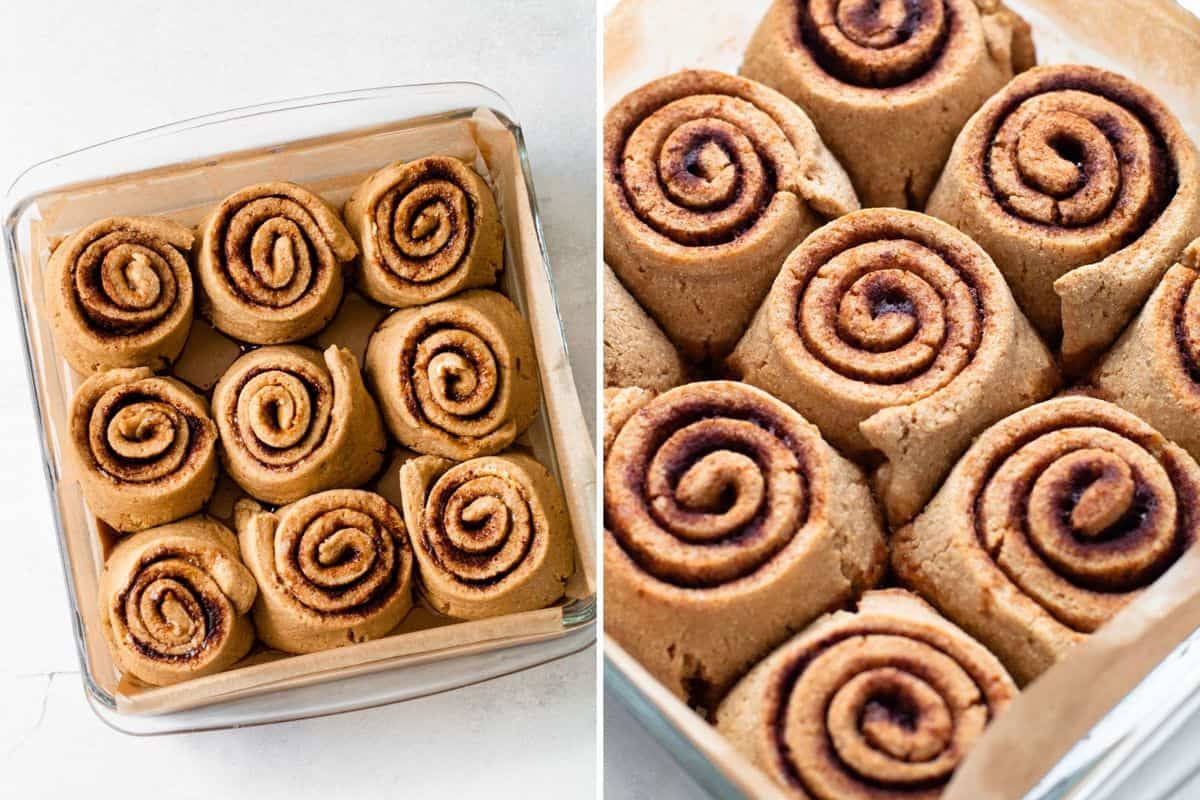
Once you have formed the cinnamon rolls, cover the baking dish with a piece of plastic wrap and place it in a warm, draft free place. I don’t recommend sticking this in the oven to proof, but simply leaving it at a warm room temperature, or on top of the oven as it preheats is sufficient.
It needs about an hour to rise up. The dough will not be double in size. Instead, it will become puffy, and the cinnamon rolls should be all touching each other. Reference the photo above for how they will look when they have risen enough. I do not recommend letting this dough rise for more than an hour and a half. And I did try proofing it overnight and the cinnamon roll dough was not able to rise due to the nature of the gluten-free flours in this recipe.
Once the rolls have risen for an hour and become puffy, it’s time to bake!
Icing Options
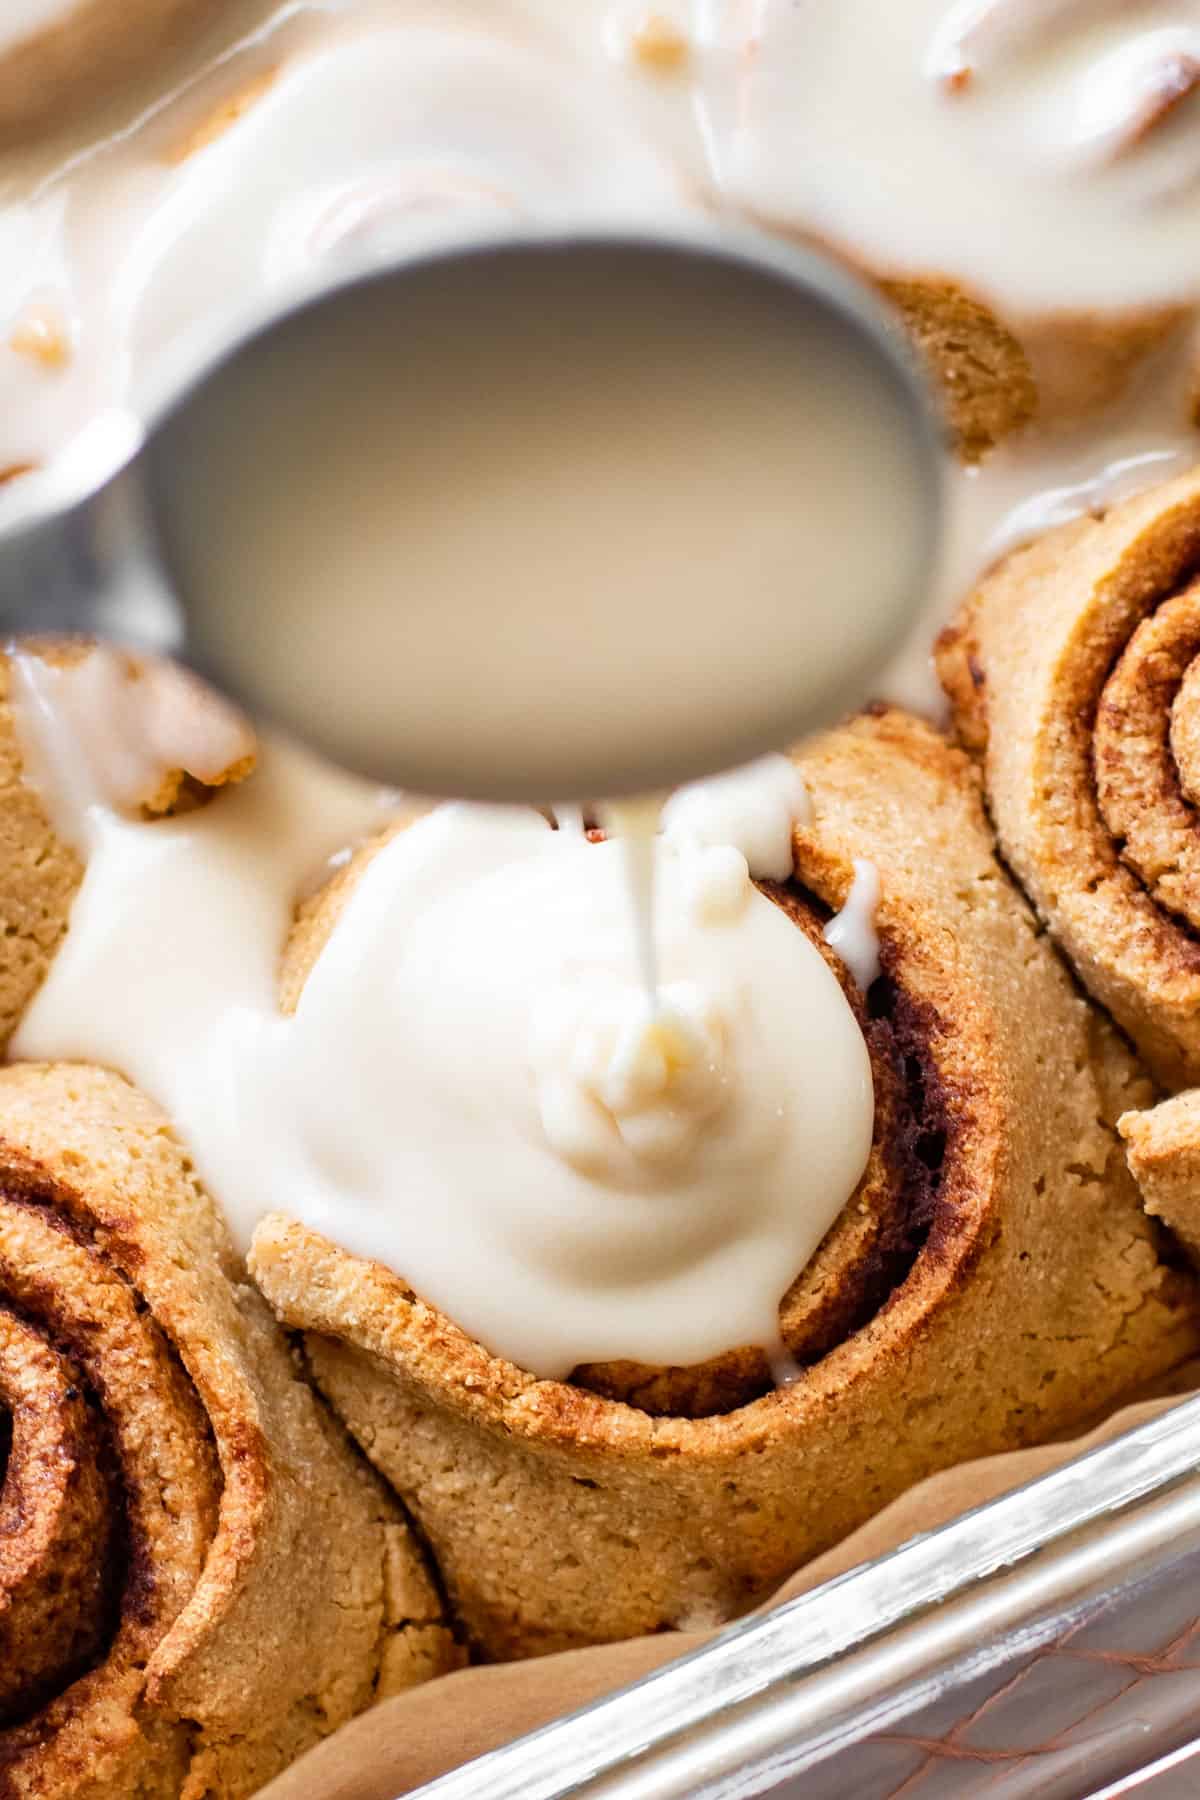
Icing the cinnamon rolls serves two purposes here. The first is that it’s just delicious. What’s a cinnamon roll without icing, right?
But in addition, the icing on these gluten-free cinnamon rolls also helps soften the dough and keep the moisture in. So this recipe recommends icing the rolls about 10 minutes after they’re made.
This recipe calls for simple vanilla icing made from powdered sugar, milk and a splash of vanilla.
If you wanted to use a cream cheese frosting, check out this Pumpkin Cake recipe which uses a cream cheese frosting sweetened with maple syrup.
Another refined sugar-free option would be to use the cashew glaze from this Overnight Cinnamon Roll French Toast.
How to Store Them
These gluten-free cinnamon rolls are best eaten while they are slightly warm (don’t attempt to eat them while they’re super hot as oat flour baked goods tend to taste a bit stodgy when hot). They’re also best eaten within the first day or two after they’ve been made.
We recommend slightly warming them up before eating again if you do store them.
I’ve found they keep well at room temperature for about 2 days. They can be stored in the refrigerator for longer, but you’ll need to warm them up before serving.
Watch the video here:
For more gluten-free baking recipes, check these out:
- Gluten Free Banana Bread
- Coffee Crumb Cake Muffins
- Gluten-Free Pound Cake
- The BEST Gluten-Free Layer Birthday Cake

Gluten Free Cinnamon Rolls
Ingredients
For Cinnamon Rolls:
- 1-1/2 cups oat flour 180 grams
- 1 cup 112 grams coconut flour
- 1 cup 120 grams tapioca flour, divided
- 2/3 cup coconut sugar divided
- ½ teaspoon baking powder
- 2-1/4 tsp. instant rapid rise yeast ¼ ounce packet equals 2-1/4 teaspoons
- 1/2 teaspoon salt
- 1-1/2 cups milk
- 2 eggs
- 5 tablespoons softened butter divided
- 2 teaspoons vanilla
- Avocado oil spray or other baking spray
- 1 tablespoons cinnamon
For Vanilla Glaze:
- 1-1/4 cup powdered sugar
- 1-2 tablespoons milk-of-choice
- ½ teaspoon vanilla extract
Instructions
- Lightly grease a 9” square baking dish (or similar sized) and optionally line with parchment paper (this makes removing the cinnamon rolls easier). Set aside.
- Whisk together oat flour, coconut flour, ½ cup tapioca flour, ⅓ cup coconut sugar, baking powder, yeast, salt together in a bowl and set aside.
- Add remaining ½ cup tapioca flour to a nonstick medium pot. Slowly whisk in about ⅓ of the milk until the mixture is smooth. Then, whisk in the remaining milk.
- Heat the pot with the milk mixture over medium heat, stirring constantly with a rubber spatula, until it completely thickens up to a very sticky ball, about 5 minutes.
- Immediately remove from heat and transfer the sticky mixture to the bowl of a stand mixer fitted with a paddle attachment. Let the mixture slightly cool, for about 2-4 minutes.
- Mix on low speed for 1 minute to let the steam escape. While the mixer is running, add the eggs, one at a time, letting each egg incorporated before adding in the next.
- Once incorporated, add 1 tablespoons of butter and vanilla extract and mix until fully combined. Scrape down the sides and the bottom of the bowl to ensure everything is incorporated.
- Add half of the dry ingredients, and mix together on low until combined, then add in the remaining dry ingredients. Beat for 1 minute on medium-high until the dough is well combined. It should be a thick and sticky dough.
- Line a clean work surface with a large piece of parchment paper, at least 12x16 inches long. Spray the parchment with avocado spray.
- Spray a rubber spatula with avocado spray, and use the spatula to remove the sticky batter from the mixing bowl and onto the greased parchment paper. Similarly, grease your hands with the avocado spray and then pat out the dough into a 12x16 inch rectangle. If at any point the dough is sticking to your hands, clean your hands, dry them and spray them again. Using clean and well-oiled hands will prevent the dough from sticking to you.
- Spread the remaining 4 tablespoons of butter on top of the dough. Sprinkle the remaining ⅓ cup coconut sugar evenly over the dough, and then sprinkle the cinnamon evenly over the dough.
- Using a pastry wheel or a knife, cut the dough on the long end into 9 strips, about 1-3/4” wide.
- Using clean and well-oiled hands, roll up one strip of dough to form the cinnamon roll and place into the prepared baking dish. Repeat with the remaining 8 strips.
- Cover the baking dish with plastic wrap, and let it rise in a warm room temperature spot for one hour. I recommend placing it near the oven as it is preheating.
- Preheat the oven to 375ºF.
- After one hour, the rolls should be quite puffy and touching each other, but they will not have doubled in size.
- Bake on the middle rack in the preheated oven for 30 minutes, or until the cinnamon rolls have reached a temperature about 200ºF.
- Let the rolls cool for about 10 minutes while you make the glaze. Whisk together the powdered sugar, milk and vanilla until smooth and creamy.
- Pour the glaze over the cinnamon rolls and let the rolls sit for at least another 10-20 minutes to continue to cool before serving.

Hello there Lexis your cinnamon rolls sounds lovely but I need to use as little yeast as possible can I just add extra baking powder please and maybe small amount of the yeast? Please reply to me
Hi Rose – they are delicious, unfortunately we haven’t tested with the baking powder swap so I cannot confirm that will work.
Hi Lexi, these look wonderful and delicious; I can’t wait to try them. I cannot get the video to open on the “Watch the Video Here” when I tap it. This is the second time I’ve experienced this. On this recipe I
really feel strongly that I ought to watch it as you mention that a few times in your text. 👀👂Any ideas?
By the way, I love all of your recipes and have made so many of them. Thanks for your passion ❣
maybe try clearing your cache? or see this link! https://lexiscleankitchen.com/gluten-free-cinnamon-rolls/
Well, thank you so much. I will try those options. Then I will bake some up and let you all know how I did.
Blessings,
What brand of instant yeast do you use?
Is it possible to make with a hand whisk?
I subbed coconut with almond flour, and tapioca with all purpose. It turned out great.
I love Cinnamon Rolls! I eat gluten free and grain free so don’t eat oats. Do you have any alternative flour combinations that I could substitute for the oats? I know it’s a main ingredient so even any ideas would be helpful even if you haven’t tried them.
My daughter in law’s Christmas morning tradition when growing up…warm cinnamon rolls for Christmas breakfast. Shortly after marrying my son and moving 1000 miles away from her childhood home, she had to begin a gluten free diet and we couldn’t make her traditional breakfast.
I tired this recipe a month ago and I’m happy to say, she will be able to enjoy your her childhood love again! 🎄❤️
Hi, I can’t wait to try these. I was wondering if you have experimented yet with making these with pumpkin? I am craving a pumpkin cinnamon roll!!
These were easier to make than I anticipated and they turned out very pretty! This was my first attempt at GF cinnamon rolls and they turned out good, in the future I think I would add more cinnamon and change the frosting to more of a cream cheese frosting in an attempt to have more of a “gooey” roll.
Made these and they are delicious! I love how easy it was to make. I have tried other gluten free cinnamon roll recipes and they never have turned out as good as these. The dough was also surprisingly easy to work with and easy to roll up. I will definitely be saving this recipe and be making them again. Yum!!
Tried these and never going back to regular! These were so easy to make and came out so delicious!!!! I’ve tried other GF/DF recipes and this one takes the cake 😉 Can’t wait to share at our next family gathering. I used Malk (best almond milk on the market) and vegan butter and it worked perfectly! Dough was a little dry so I added just a tad bit of unsweetened apple sauce and it helped make them nice and moist! (A trick I took from Lexi’s amazing paleo pancakes!)
So delicious, the perfect Mother’s Day breakfast. Definitely follow all instructions, keep hands clean and greased, or rolling can get a little messy. I do wonder if the dough could be made the night before because my little ones were very inpatient while I made these this morning haha. Thanks for spending so much time making these wonderful treats!
These were an excellent alternative to my go-to gf/df cinnamon roll recipe!
I used oat milk, vegan butter (Earth Balance), organic cane sugar in the dough, and brown sugar in the filling. I rolled the dough out a little too far and it tore a bit while rolling them up so I highly recommend making sure to stick to the recipe dimensions. They still cooked up beautifully and were a fun Mother’s Day breakfast. Also of note, I made them the night before, let them proof for an hour before refrigerating, then stuck them in the oven when I started the preheat.
Thank you for putting so much into this wonderful sweet treat!!
These were very good! The directions were very clear. I only had soy milk on hand, so I’ll try with whole milk next time.
thank you! I’d never know the correct portions of “alt” flours without your recipe, I really appreciate being able to make these without traditional flour
The cinnamon rolls taste really good once they are done. The process was easy. The dough gets really sticky and it was a little hard to roll the cinnamon rolls but once you accomplished to roll them, put them in the pan, and baked them, they are yummy.
FINALLY a GF cinnamon roll that I can actually make! I’ve tried so many other recipes and all have failed (could possibly be my baking skills). My family all loved these and said they were better than our local GF bakery! Definitely remaking for Mother’s Day!
So I made these yesterday. They turned out sooooo gooooood! I only had half the tapioca so I used cornstarch for the rest. They aren’t quite as perfect as Lexi’s but they turned out so tasty! I also used milkadamia because that’s all I had on hand and I’m not about to make a trip to the store during a covid spike. I froze them individually and can confirm they are great heated up for twenty seconds in the microwave.
This is awesome! Thanks so much for sharing!
Did y’all trying freezing them? If so, how did they turn out?
We didn’t try, but because they’re best tasting freshly made, we suspect they wouldn’t turn out great. But if you do give it a try, let us know how it goes!