
This post may contain affiliate links. Please read my disclosure policy.
For many things it’s easier to buy product at the store instead of making at home, but sometimes the resulting homemade product is SO GOOD that it’s worth the effort which is why we’re talking all about How to Make Coconut Milk Yogurt in the Instant Pot! Made in partnership with our friends at Vital Proteins!
 How to Make Coconut Milk Yogurt in the Instant Pot
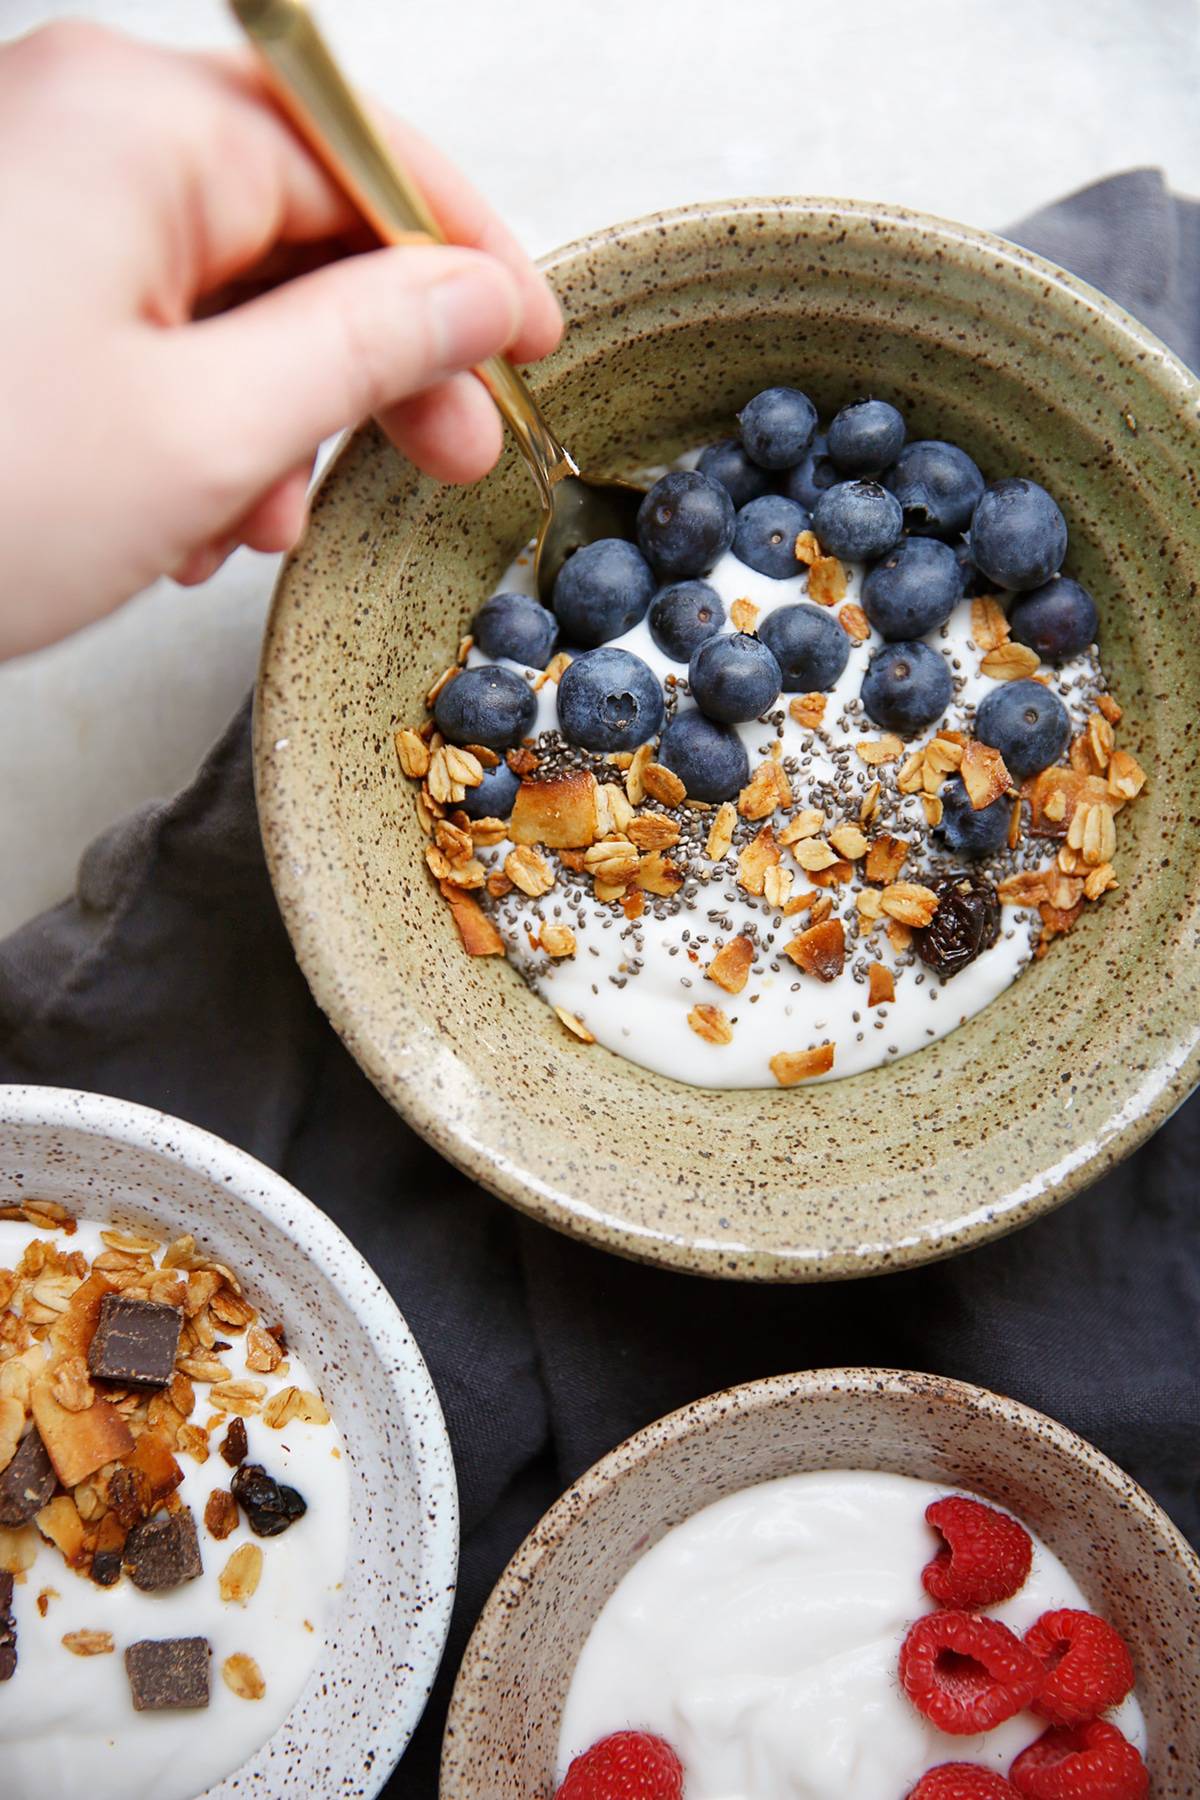
Sometimes we are so excited about a recipe that we absolutely cannot wait to share, and How to Make Coconut Milk Yogurt in the Instant Pot is definitely one of them. There is no hiding the fact that there are a few steps needed to complete this recipe, because after all it is making yogurt at home. But trust us when we say the resulting Coconut Milk Yogurt is so worth the effort. It’s so incredibly delicious and creamy, it’s super filling and only contains a very minimal amount of maple syrup. It’s worlds-away-different from anything you’ll buy at the store and you control the amount of sugar that goes in it! It’s dairy-free and even compatible with low-carb diets. We are so in love with this dairy-free yogurt and are so excited for you to get your hands on this recipe!
We also love that homemade yogurt has way more probiotics than most anything you can buy at the store, because you can control how long you ferment the yogurt. The longer you ferment the more probiotic bacteria you have! We also can attest that making yogurt is so much cheaper than it is to buy at the store.
Prefer to make dairy yogurt? Check out this post.
Why coconut milk yogurt and why in the Instant Pot?
Buying a dairy-free yogurt in the stores usually means choosing one that is heavy on the sugar or is flavored and sometimes we’d just like a plain dairy-free, lower-carb yogurt that isn’t going to feel like we’ve eaten a candy bar. We loved the idea of doing it in the Instant Pot because it means we don’t need to buy a separate gadget to incubate the yogurt (and we know there are ways to do it without any gadget, but we’d prefer the controlled temperature). Of course, we are talking about an Instant Pot that has a yogurt function button. However if you do have a dedicated yogurt maker, you can certainly use it with this recipe as we opt to heat the milk on the stove because we didn’t like that heating it in the Instant Pot left the milk stuck to inner pot and in turn left the resulting yogurt chunky. If you prefer to skip this and just do the whole thing in the Instant Pot you can! All you need to do is hit the yogurt button until it says boil, and then let the Instant Pot do the rest. You follow the remainder of the steps after that.

What does it actually mean to make yogurt or ferment food?
In a nutshell, when you are making yogurt you are introducing bacteria cultures to milk and creating a warm and comfortably environment for them to grow for a specified period of time, or ferment. The culture is either a purchased yogurt culture or probiotic capsule that is combined with the milk to inoculate the batch with bacteria. You can also make yogurt with a previously inoculated batch of yogurt. The introduced bacteria feed off of the sugar in the milk (see below for difference with coconut milk) and will thrive and multiply in an environment around 110 degrees or so, and the Instant Pot Yogurt setting keeps the milk at that temperature consistently.
If you’ve never made yogurt or fermented food before this can seem a little daunting. But once you get the hang of it making it will seem easy and can be done every week for an unending supply of yogurt!
How is coconut milk yogurt different than dairy yogurt?
There are a few tricks needed to make yogurt out of coconut milk that don’t apply when you are making dairy milk. Namely that coconut milk does not have a lot of natural sugar in it so it needs the addition of maple syrup to feed the bacteria and that it does not thicken the same as dairy once it’s fermented so we use gelatin to create the consistency we want.

Tips on How to Make Coconut Milk Yogurt in the Instant Pot
- Read through the entire post and follow all of the recipe instructions. This is the type of recipe where the directions sound so specific and it’s all for a reason!
- If you are making this for the first time purchase a starter culture. After you’ve made the yogurt for a few times and have a feel for it you can start saving a tablespoon of yogurt to make new batches, but wait to do that until you’ve got the hang of making yogurt.
- Clean all your utensils and cookware and anything else you are going to use with hot soapy water, or place in the dishwasher. Generally speaking whenever you are fermenting food you want to make sure your cookware and utensils are sanitary so you don’t encourage the growth of bad bacteria. We also remove the inner seal from the Instant Pot lid because it has a tendency to hold on to odors, and they will definitely transfer to the yogurt.
- Use an instant read thermometer (we love our Thermapen: it’s an investment but one that will last forever) to make sure you have the correct temperature when heating up the milk and cooling it down so you don’t accidentally kill the starter culture by placing it in liquid too hot. If you don’t have an instant read thermometer make sure the milk is warm, but not hot by pickup up a couple of drops and putting them on your inner wrist. If it feels very warm it’s likely too warm for the bacteria.
- Don’t skip out on the maple syrup. It is needed to feed the probiotic bacteria, without it your yogurt will never become yogurt but will instead be just a spoiled batch of coconut milk.
- The longer you ferment the yogurt the tangier it will be. But you CAN ferment it too long. Check the package of your yogurt starter to see what it recommends. We found a sweet spot between 12-16 hours, but if your package says something different start out with that time and see how your yogurt tastes. If it isn’t very tangy try fermenting it for longer than next time you make a batch to get the yogurt you think tastes best.
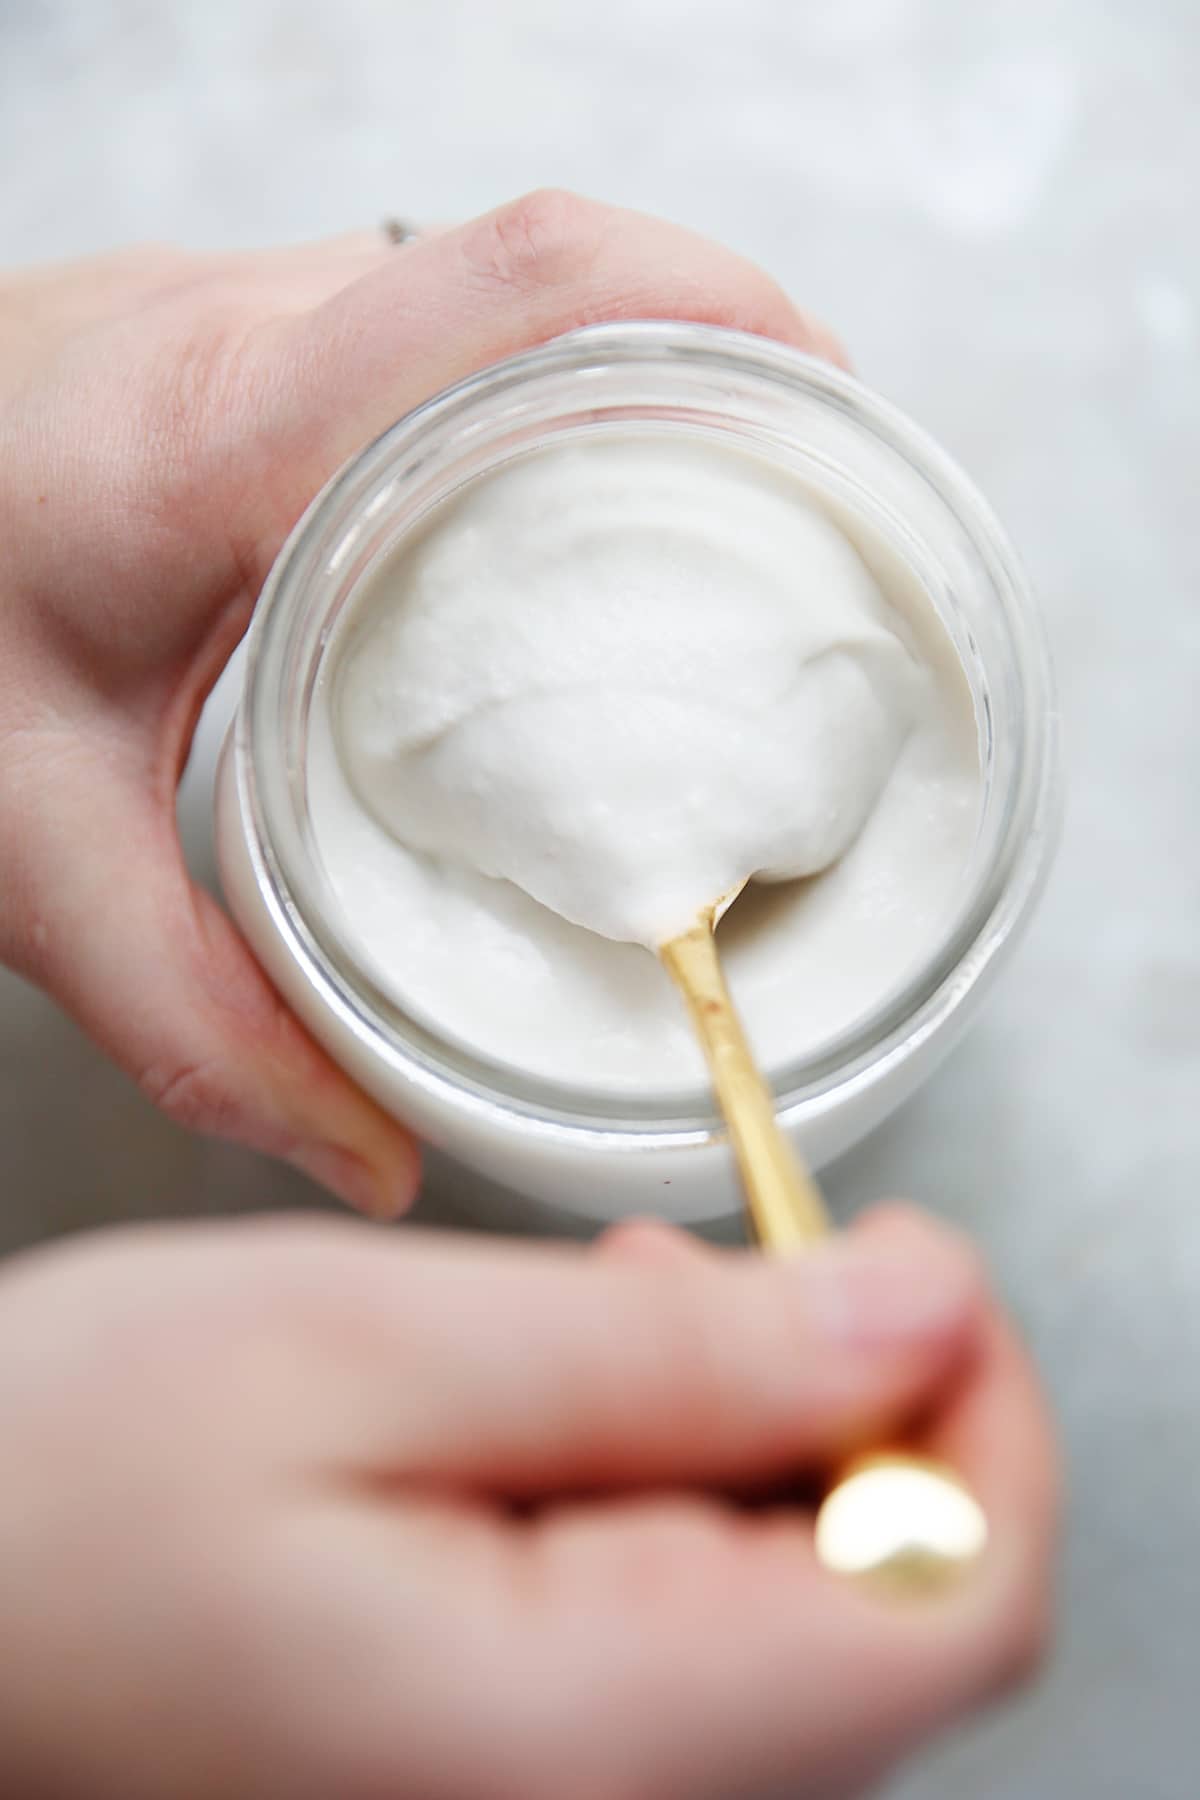
- Whisk the finished coconut yogurt while it’s still warm until it is fully emulsified. It will not be very thick when it is warm though because the gelatin needs to set up.
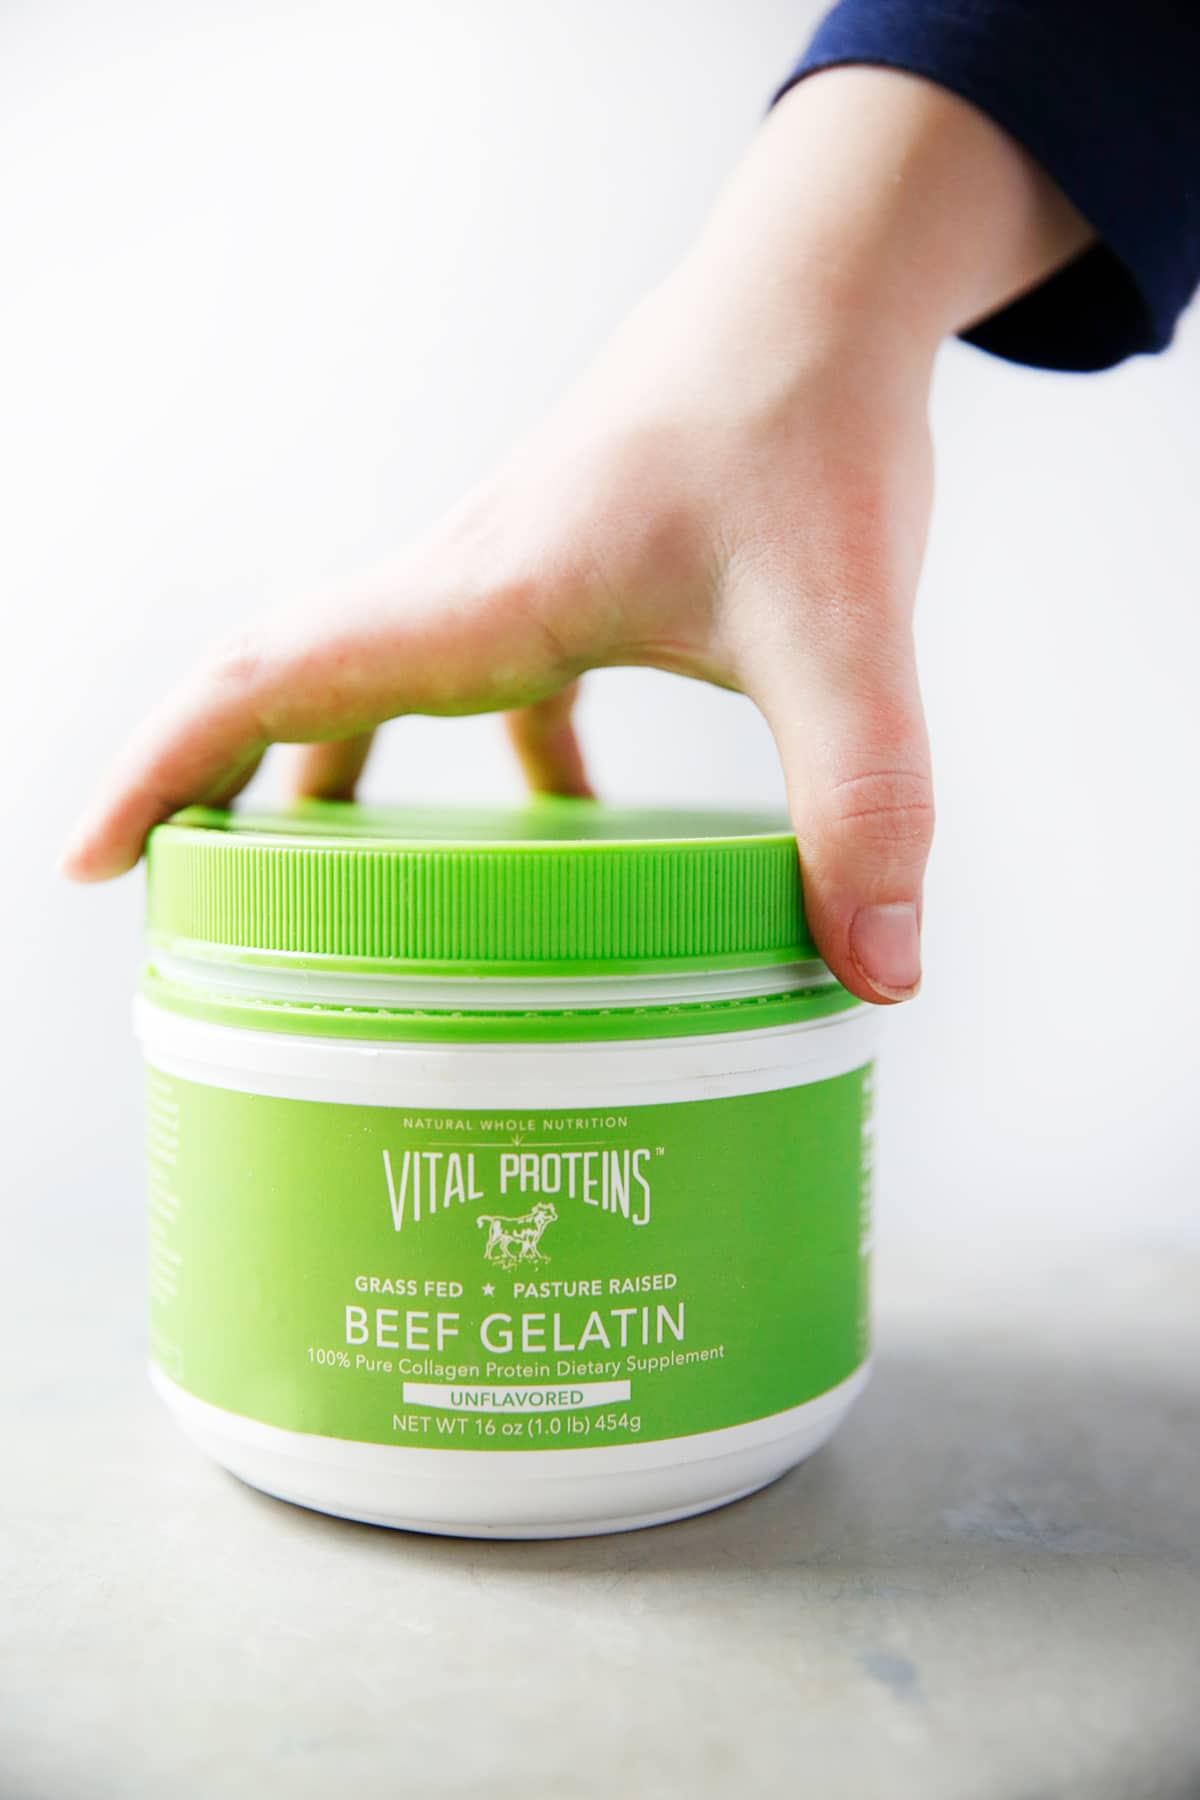
The biggest difference between making yogurt with coconut milk and dairy milk is that it doesn’t quite thicken the same way dairy does. Because of this coconut milk yogurt needs a thickener and we love using gelatin for this. To be sure, even though this yogurt is dairy-free, it is not vegan because it uses beef gelatin. We use our favorite Pasture-Raised Beef Gelatin from Vital Proteins in our yogurt and love that it gives it an added boost of nutrition thanks to the collagen. Vital Proteins is known for their Collagen Peptides, which is great to use in everyday drinks like your morning coffee or food, but we love being able to use their good quality gelatin here in this yogurt. Adding collagen to your diet can be a great way to improve and promote bone and joint health, aid in healthy digestion and gut health, improve sleep and nourish your skin. We love adding it to overnight oats, smoothies, and more.
For this recipe, make sure you’re grabbing the green container. While gelatin does have collagen, it isn’t the same as the Collagen Peptides (blue container) as it has special attributes that transform liquid and is perfect for jello, marshmallows, homemade candies/gummies, and of course thickening up this amazing yogurt!
Don’t be intimidated to make your own yogurt, simply watch the video:
If you like this How To, check our these others:
- How to Cook a Whole Chicken in the Instant Pot
- How to Make the BEST Oatmeal
- How to Make Cashew Cream
- How to Make Homemade Vanilla Extract
- How to Make Cold Brew Iced Coffee
- How to Make Yogurt in the Instant Pot
Tools we used to make this recipe:
- Instant Pot (We love our 6 qt.)
- Probiotic Yogurt Starter: We have used this one, this one, and this one.
- Vital Proteins Grass-Fed Gelatin
- Thermapen
How to Make Coconut Milk Yogurt in the Instant Pot (Dairy Free)
Ingredients
- 1 5.4 ounce can coconut cream
- 1 13.5 ounce can coconut cream
- 1 13.5 ounce can coconut milk divided
- 1 tablespoon Vital Proteins Beef Gelatin
- 1 Packet Dairy Free Yogurt Starter ours was 5 grams, but yours might differ or 1 tablespoon prepared dairy free yogurt with live cultures
- 1 tablespoon maple syrup
Instructions
- In an Instant Pot with a yogurt function, remove the seal from the lid. Clean the lid and the inner pot with hot soapy water, or place in the dishwasher, and dry thoroughly. Set aside. (see note)
- Place coconut milk and cream in clean medium pot, reserving ¼ cup of the coconut milk in a small bowl. Heat coconut milk over medium heat until it has started to steam and bubble around the edges, to 180ºF (we like to use our Thermapen for this).
- Meanwhile add Vital Proteins Beef Gelatin to the small bowl with coconut milk and stir to combine and let it soften.
- Once coconut milk has reached 180ºF, take a few tablespoons of hot milk from pot and whisk into the bowl of softened gelatin until it is completely dissolved. Add the dissolved gelatin mixture to the pot of coconut milk and whisk together.
- Place the hot coconut milk in the Instant Pot inner liner, and let cool until it reaches 105ºF - 110ºF, about 40 minutes.
- Once it has cooled enough, in a small bowl (you can use the same one as gelatin) add the live culture together with about ¼ cup of the coconut milk and whisk until it is fully combined. Add it back to the inner pot, add maple syrup and whisk until combined. (see note)
- Press the Yogurt function on the Instant Pot until it displays a timer. Set for 8-16 hours, depending on how tangy you want your yogurt and close the lid (see note). Close the lid (without the inner seal). It does not matter whether you press sealing or venting.
- Once finished fermenting, whisk the coconut yogurt until it is fully emulsified. It will not be very thick right now because the gelatin needs to set up.Transfer to containers and into the refrigerator to set up at least 4 hours.
- Yogurt will keep in the refrigerator for 5-7 days.
Notes
- Read the entire article on How to Make Coconut Milk in the Instant Pot.
- You want to make sure the Instant Pot is clean for two reasons: the first is because you are fermenting food and you want to make sure there is no bad bacteria on your Instant Pot. The best way to do this is to put all of your equipment through the dishwasher right before use, or wash with hot and soap water. The second is because if there is any smell leftover on your lid or inner pot, which is known to happen in an Instant Pot, it will likely transfer to the yogurt. So clean it really well.
- We are heating up the milk in a pot on the stove because we have found that the milk can get burned when it is heated in the Instant Pot and results in chunky yogurt. If you wish to use the function on the Instant Pot that brings the milk to the proper temperature you can do that.
- Coconut yogurt does not thicken the same as dairy milk. That is why you need the help of the beef gelatin. If you wish to skip this to keep it vegan the resulting yogurt will be thin and like a smoothie.
- You want your cooled coconut milk temperature to be accurate before adding your culture because if it’s too hot, it could kill the live culture but if it is too cold it might disturb the fermentation. If you wish to speed up the process of the milk cooling down you can place the pot in a ice bath. Just make sure to watch the temperature as it will cool quickly, around 10-15 minutes depending on how cold the ice bath is. If you cool off the milk in the IP inner pot make sure to dry it off thoroughly before using.
- There may be a thin skin that has formed on the coconut milk after it has cooled. This is normal, just whisk it together.
- The longer you ferment the yogurt, the tangier it will be as the bacteria consumes all of the sugar and the more probiotic bacteria will grow. We tried the yogurt at 8 hours, which was not very tangy at all, to 16 hours which was a bit too tangy for us. We preferred the yogurt on the higher end of fermentation around 12 hours. However depending on the type of culture you are using it may give a different length of time, so be sure to check the instructions on how long to ferment the yogurt.
- The finished yogurt will not be as smooth as dairy yogurt because it hasn’t been homogenized in a factory and there are no additives in it! If it does separate, you can whisk it together or use an immersion blender until it is smoother.
- If at any point in the process your yogurt starts to smell bad, taste bad, or has any gray or pink liquid something has gone wrong and you will want to throw it out. Yogurt should be pleasantly tangy, but not taste “bad”. We have experienced the yogurt turning bad during one testing phase when we forgot to add the maple syrup and we assume it’s because the bacteria didn’t have any sugar to feed on so they died and the yogurt turned.
Nutrition
This post is sponsored by Vital Proteins. All thoughts and opinions are always 100% ours! We love the integrity of their products and think you’ll love them too. Thank you for continuing to support us and the brands we love and work with!
Where did you find a 15oz can of coconut cream? I’ve been to multiple grocery stores and looked online.
We’ve purchased them at Whole Foods, Trader Joe’s and on Amazon. But they’re 13.5, or thereabouts. Not 15 ounces. Does it say 15 ounces somewhere?
What brand of coconut milk and cream do you recommend?
Hi, where I live I can only buy coconut milk with 65% coconut content. Can I use only coconut milk as well? Do I need more gelatin? Thanks.
You can give it a try! Definitely read through the whole post so you have a good handle on it. We’ve not tried with anything other than 100% coconut, so we’d be interested to hear how it goes!
Any thickener without beef? I’m making the coconut yogurt versus dairy yogurt to stay away from the meat/dairy industries… so the gelatin thickener was a bummer
Agar Agar is something people use for thickening coconut milk yogurt. We haven’t tried it, but my best guess is that it could be used here.
Thank-you. What about the starter vs a probiotic pill vs using your previous batch of yogurt for a new batch? I feel like using a prebiotic pill may be no different than taking that pill and washing it down with coconut milk? And I’m not sure if a portion of my “Lexi yogurt” is potent enough to use by itself in making a new batch?
I am addicted! Thank-you! What would you say is the difference between this method and starter vs making counter cured coconut milk with probiotic capsules besides texture? The latter ingredients are more attainable and the approach is much easier but I’m not necessarily wanting to mess with perfection …. unless I can! 🙂
Hi Elle–The difference is that in the Instant Pot it is a controlled environment so a lot less variables to contend with and felt more approachable. We haven’t tested it on the counter and can’t speak to it, but if you do, let us know how it goes! -Kelli
I found all of the ingredients and followed the recipe precisely but my yogurt didn’t thicken beyond the consistency of keifer. I’m sick. Is it possible to add additional grass fed gelatin to try and get it to thicken? Thanks, Deb
That was after chilling? If yes what brand of coconut milk did you use? You certainly can add in more gelatin as needed, but it would have to be added in while warm, so it wouldn’t make sense to do it this round. You can try adding in 1 tablespoon more of gelatin next time. -Kelli
Have you tested making yogurt with Ripple? One of my kids has a nut allergy and were told he is likely sensitive to coconut as well.
Hi! We haven’t. I wonder if it will be quite thin with a milk like ripple. The reason it works with coconut milk without added thickeners is because coconut milk is thick when chilled. My best guess is that you’d need to add more thickeners. If you experiment with it, let us know! -Kelli
I’ve seen other recipes that say you can use the contents of a probiotic capsule instead of a yogurt starter. Is that an option with this recipe?
We didn’t test that, but my best guess is that it should work. If you give it a try, let us know how it goes!
Can you use honey in place of the maple syrup?
No! Don’t skip out on the maple syrup. It is needed to feed the probiotic bacteria, without it your yogurt will never become yogurt but will instead be just a spoiled batch of coconut milk.
I made it and the taste is very good but grainy. Maybe I don’t mx the gelatin enough although I thought so. Will try again but the grainy texture is off-putting. Any ideas?
Hi Mary Ann. There are a few notes in the recipe about this. What brand of coconut milk / cream did you use? It can vary depending on brands of coconut milk how the final texture comes out. That grainy texture is small bits of the coconut cream. During testing we had a batch or two that came out less smooth and as the post says a quick fix to that is to either whisk it together vigorously or you can use a blender or hand/stick blender to smooth out the yogurt. Because the coconut milk isn’t homogenized the final texture can very depending. Make sure too to whisk it together well while it’s still warm to improve the final texture.
Does it end up tasting like maple at all?
No. But it does taste like coconut, of course!
I made it but it’s not tart at all, I had it in the pot for 16-18 hours. Remove the maple syrup next time?
We talk about it in the post – it won’t turn to yogurt if you take out the maple syrup as it’s an important part of the fermentation. It should be fairly tart, be taste more coconut-y! What brand starter did you use? Double check their directions. Sometimes starters can vary on time for fermentation.
Hi, made this yesterday after I got all the correct ingredients, this morning I was concerned because it poured easily into separate containers, Voila! couple hours later it was thick! Yeah!
Yes — it works great!
Thanks for posting this recipe and video! Seems like a great way to avoid those pesky plastic yogurt cups that are getting harder and harder to recycle. Do you ever double the recipe? I feel like I would go through 4 cups of yogurt really quickly, and if I’m going to have my IP on for 12 hours, it would be nice to get the most bang for my buck!
Yes! I’ve doubled the recipe during testing and it works just fine!
So, the coconut isn’t really being fermented, the maple syrup is. That’s what it seems to me, since the syrup is what the bacteria is feeding on.
Hi Tammy! I’m not sure what you mean by that? Fermentation is the process where lactic acid is created by the added bacteria (or yogurt starter) breaking down sugar. Yes, we add a sugar to this to feed the bacteria to make the process possible. This is similar to how bread makers add sugar to flour to make fermentation happy to breads like sourdough, as an example of her other fermentation occurs in other foods that don’t naturally contain sugar. But regardless of whether the sugar is naturally occurring or not, the fermentation is happening throughout the coconut milk. Does that make sense?
How do you “fix” runny Instantpot coconut milk yogurt that is too thin? Do you re cook it and add more starter and gelatin? And ferment again?
Hi Karen! Can you give more specifics about what happened with yours and I can try to help you troubleshoot it? It was runny after it was cold? If yes, then there was a problem with your gelatin. Coconut milk relies on gelatin to thicken, instead of the fermentation process. You can’t ferment yogurt twice.
You can use agar agar as a vegan thickener. Not exactly sure when, but I’m sure there are recipes around that state when.
Would be possible to use any type of gelatin for vegan options
What if I don’t have a Yogurt setting on my Instapot? How to make it?