This post may contain affiliate links. Please read my disclosure policy.
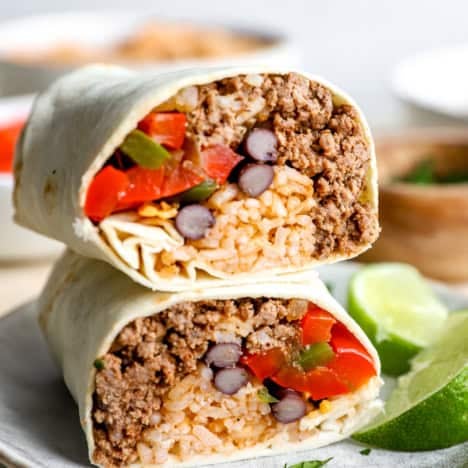
These Meal Prep Freezer Burritos are one of my favorite make-ahead meals, whether you’re stocking your freezer for busy weeks, planning postpartum meals, or putting together a gift for a friend or family member who needs nourishing food. They’re loaded with protein, veggies, flavor, and tons of options, and are grab-and-go friendly.
Whether you want to prep them all for the freezer or enjoy a few fresh burritos tonight and save the rest, these burritos are customizable, freezer-friendly, and such a lifesaver.

Homemade Freezer Burritos
These Freezer Burritos are my go-to meal-prep recipe for stocking my freezer, for anyone postpartum, someone who just had surgery, or a friend who’s sick. These burritos are easy to make, fully customizable, and can be packed with protein, veggies, and cheese. I’ve also recommended many other burrito mix-ins below. This recipe also includes options for my salsa chicken and my best-ever taco meat recipe.
HOT TIP: You can also make a double batch, assemble a couple right away for dinner, and save the rest for meal prep.
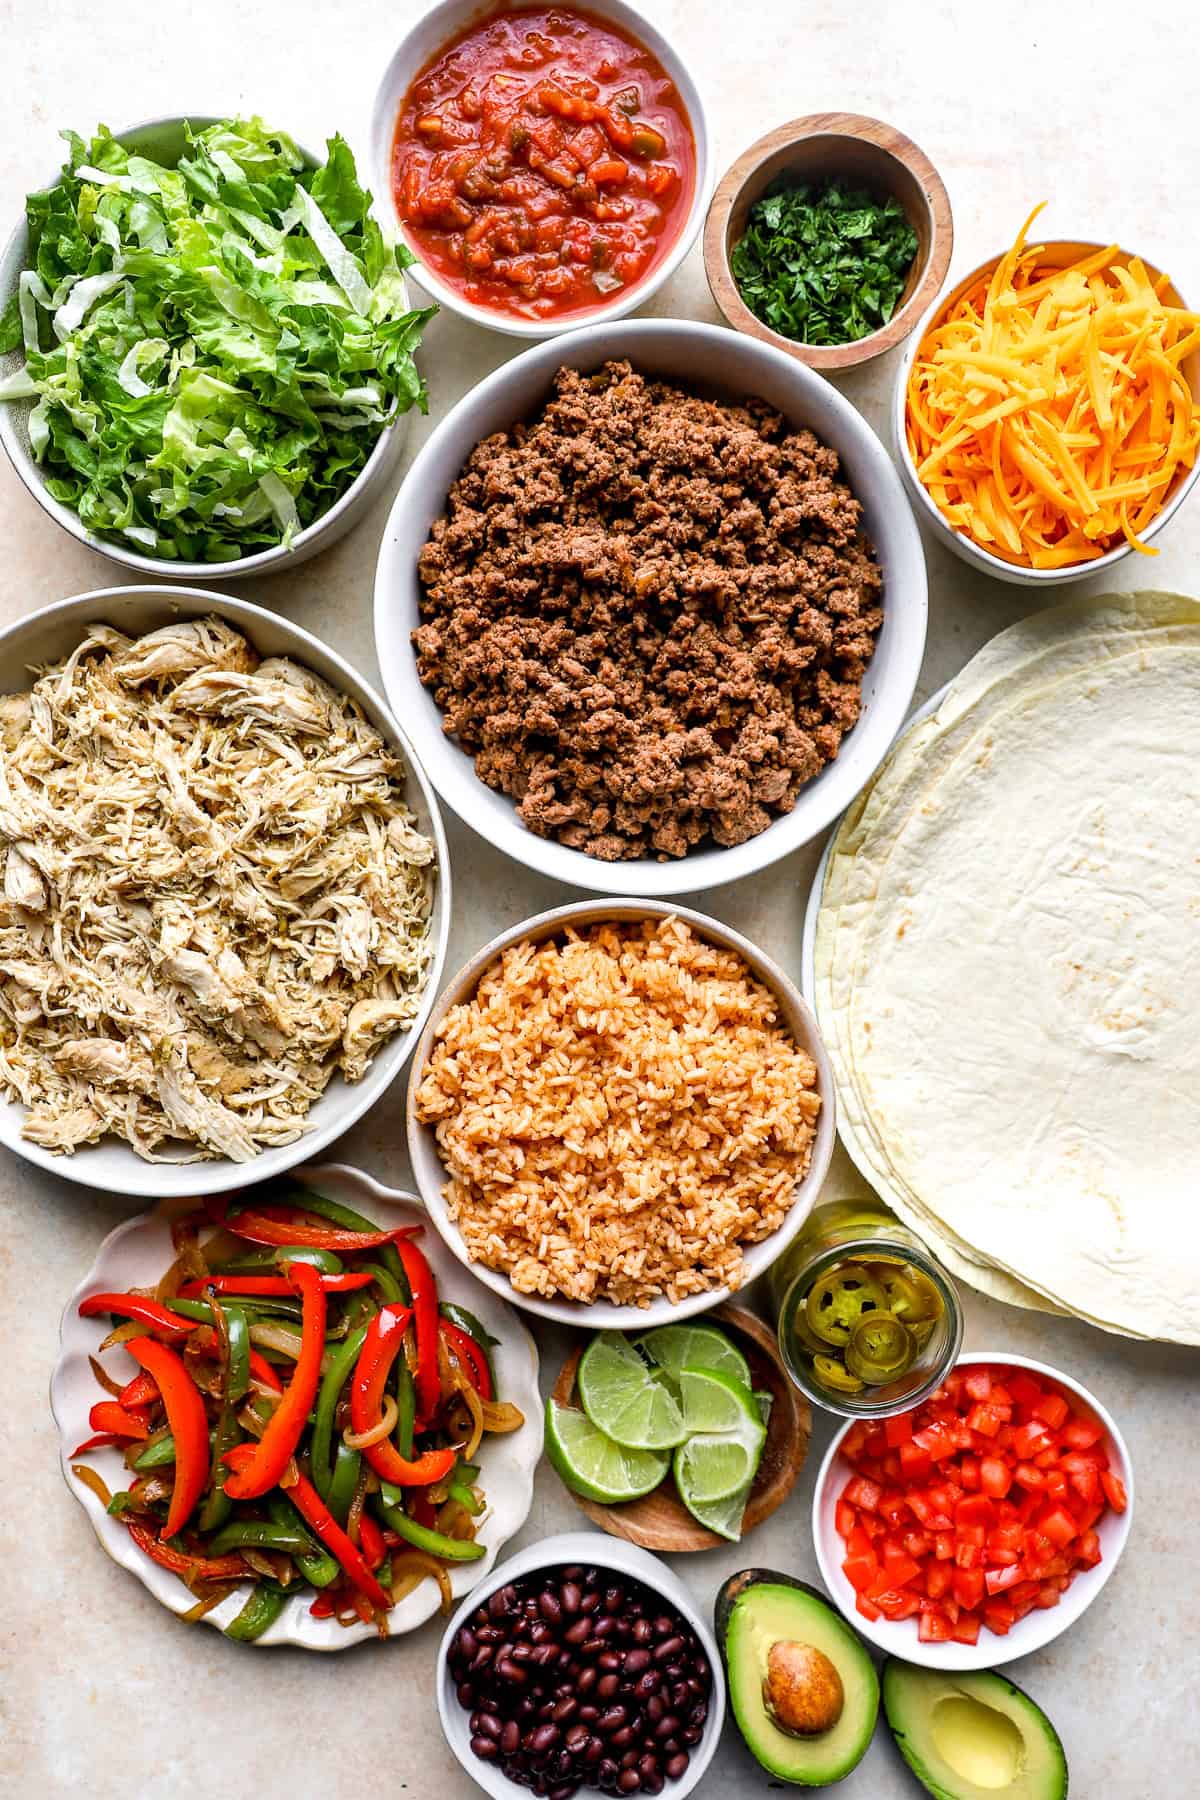
Ingredients Needed:
Scroll to the recipe card for the full details. Of course you can make just one version, both, omit ingredients… It’s up to you!
- Slow Cooker Salsa Chicken
- Chicken Breast: I use boneless and skinless chicken breast.
- Salsa: I use salsa verde to add flavor and moisture to the chicken, but any type of salsa will work.
- Best Ever Taco Meat
- Ground Beef: Use lean ground beef or make sure you drain any excess grease after cooking.
- Avocado Oil: Any cooking oil will work.
- Seasonings: We’re seasoning the taco meat with a blend of paprika, chili powder, garlic powder, onion powder, sea salt, black pepper, dried oregano, and optional cayenne pepper.
- Salsa: Salsa verde is my preference, but use any salsa you like.
- Veggies
- Avocado Oil: Or any cooking oil you like.
- Red Bell Pepper, Green Bell Pepper, and Onion: We’re using a classic blend of fajita veggies for these burritos, but feel free to add in any veggies you like.
- Salt and Pepper: With all of the flavor in the meat fillings, you don’t need much for the veggies.
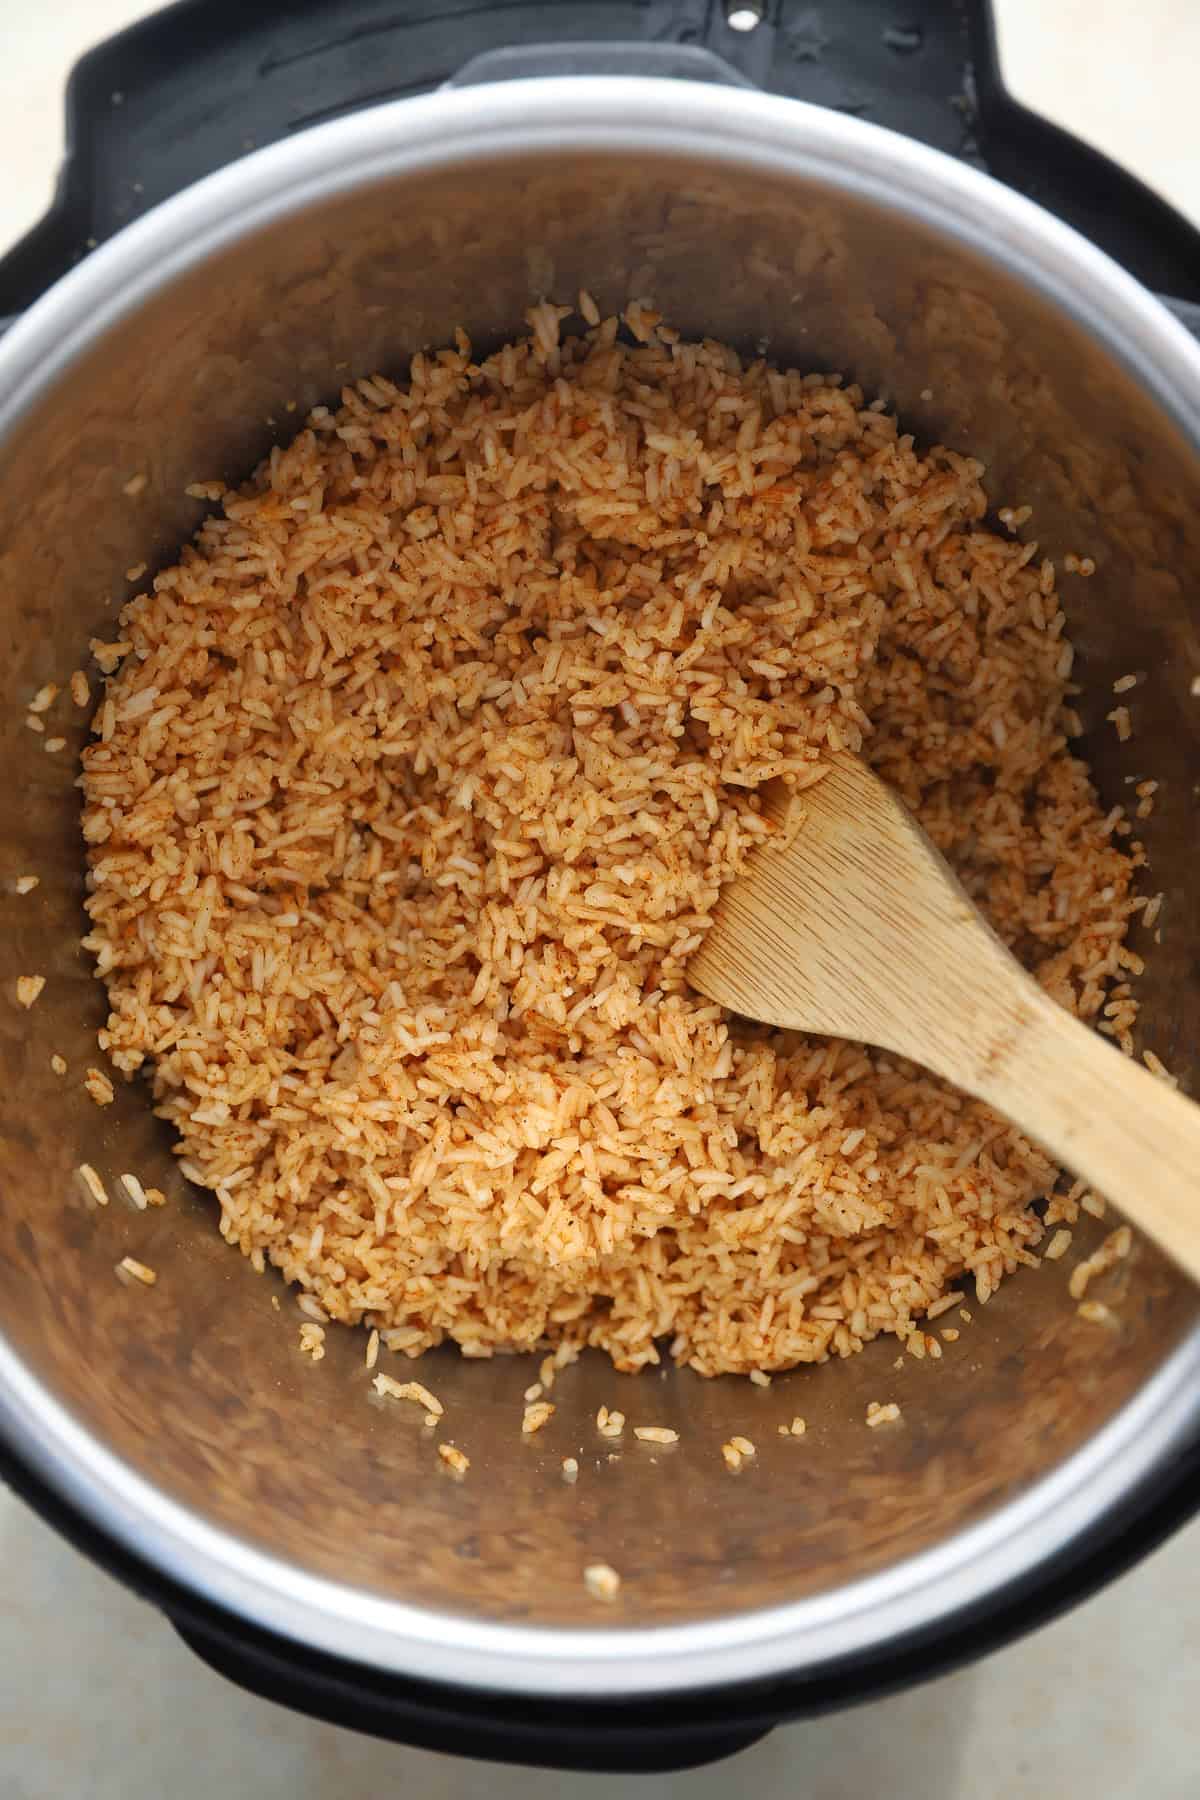
- Mexican Style Rice
- White Rice and Water: Use equal parts rice and water to cook rice in the Instant Pot. I use 2 cups of each!
- Tomato Paste: Tomato paste adds richness and flavor to the rice.
- Seasonings: I use a blend of garlic powder, cumin, paprika, cayenne pepper, sea salt, and black pepper
- For Serving
- Tortillas: Use whatever tortillas you like!
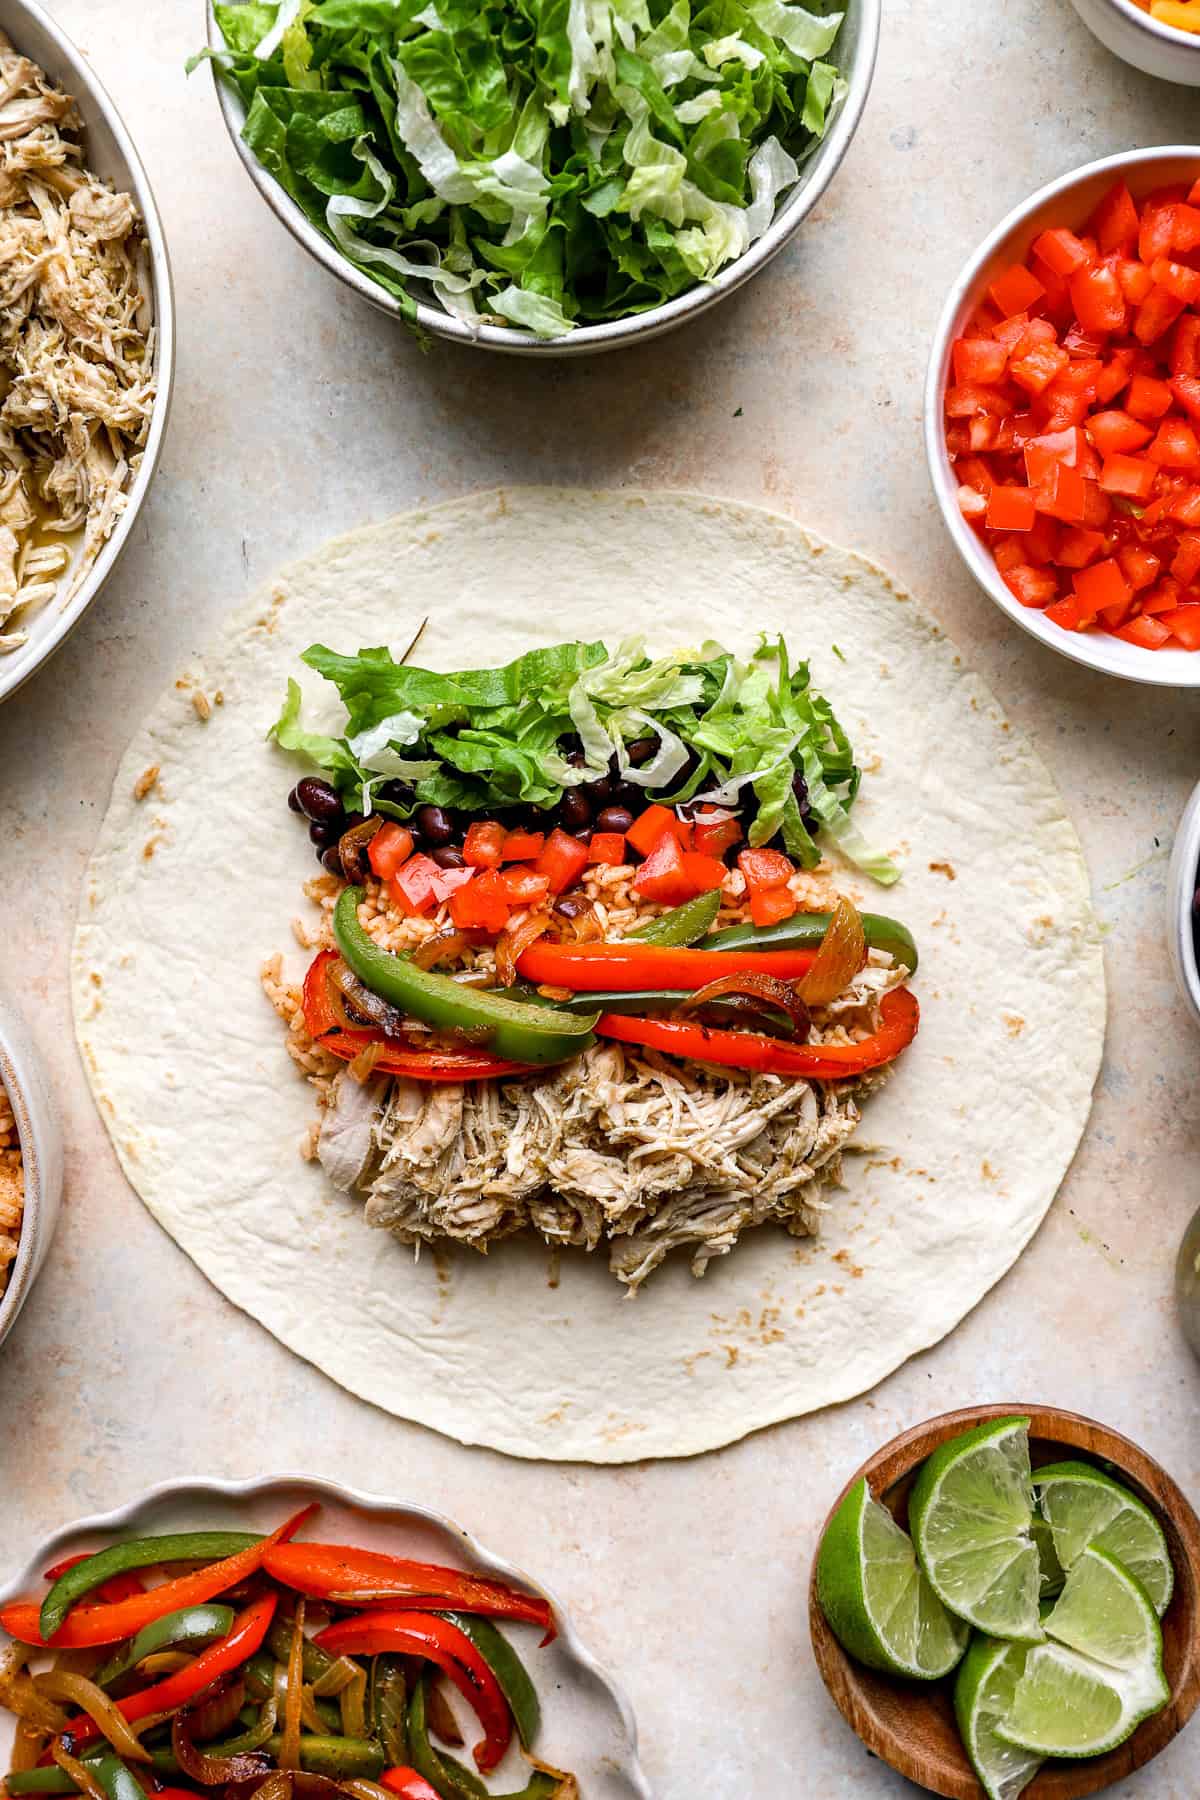
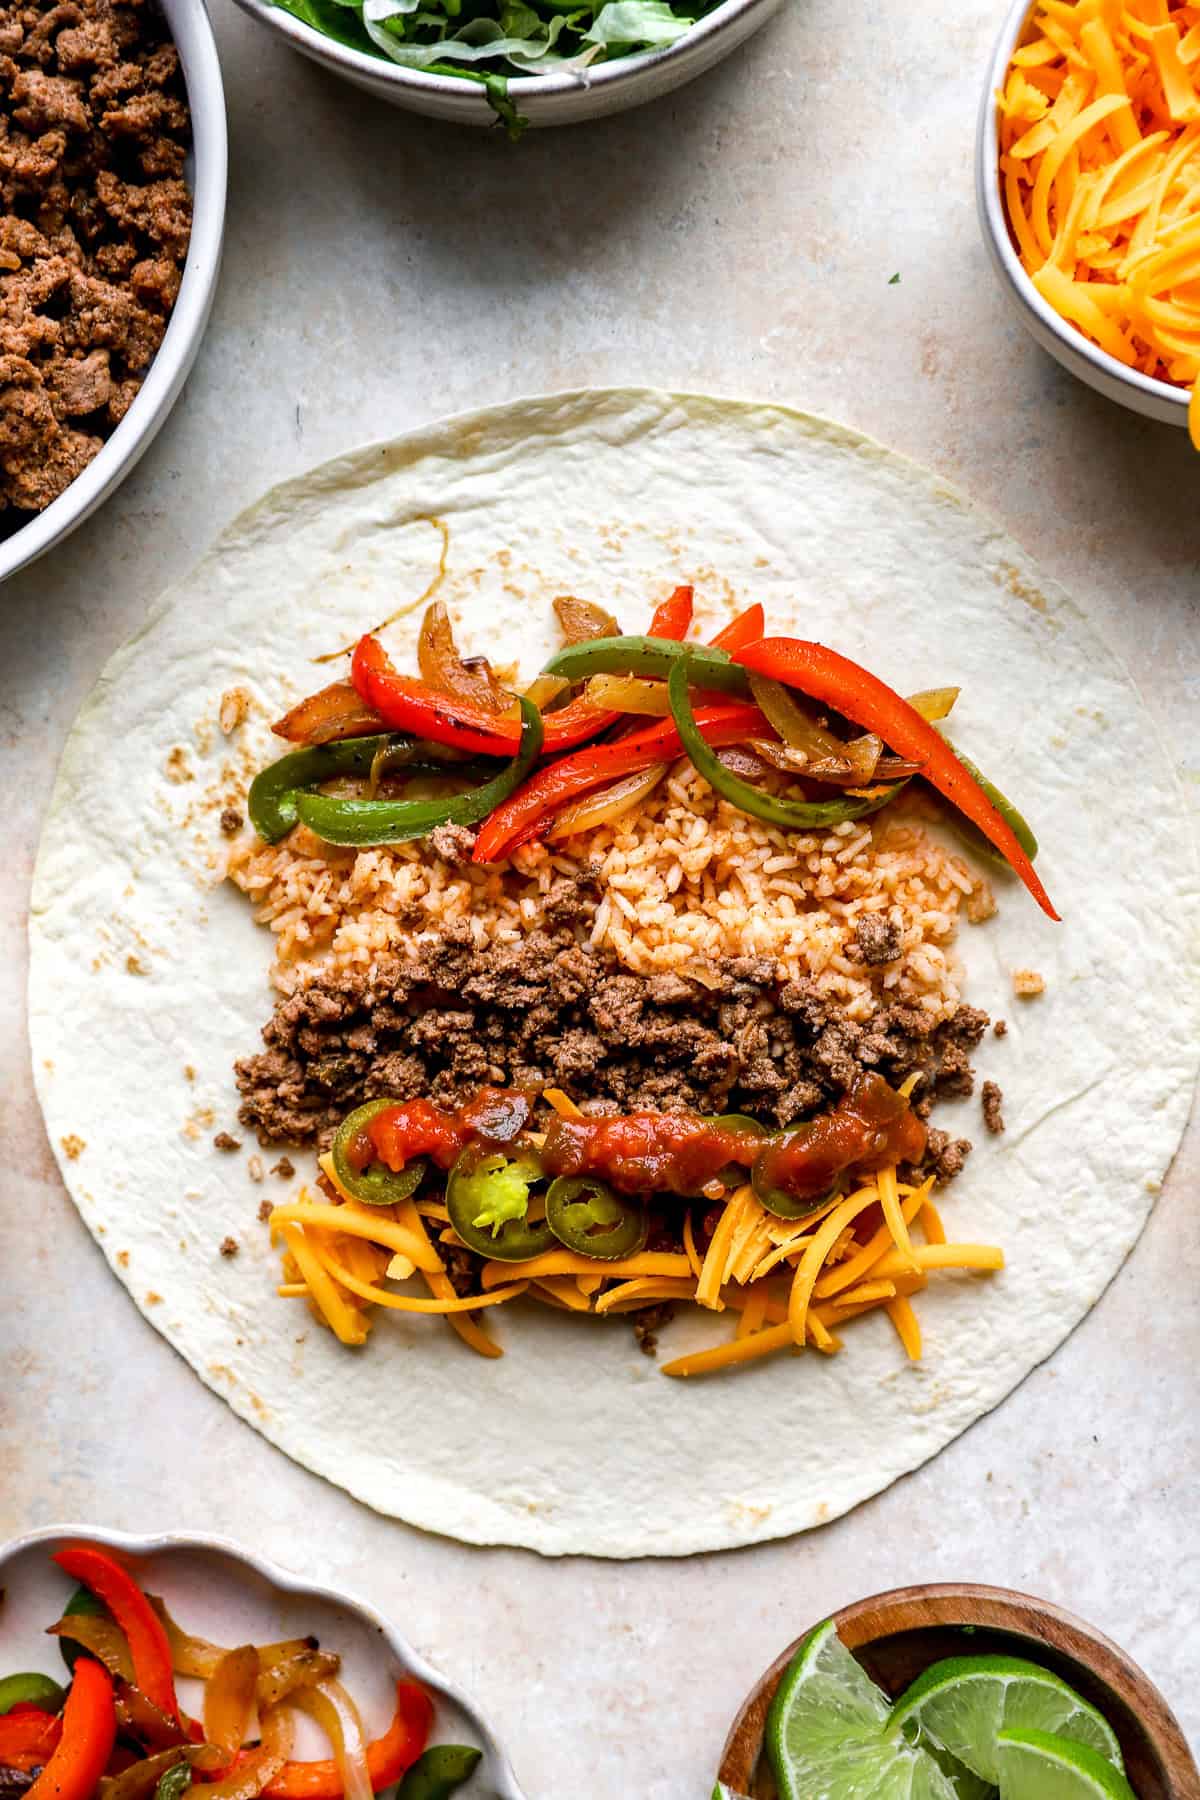
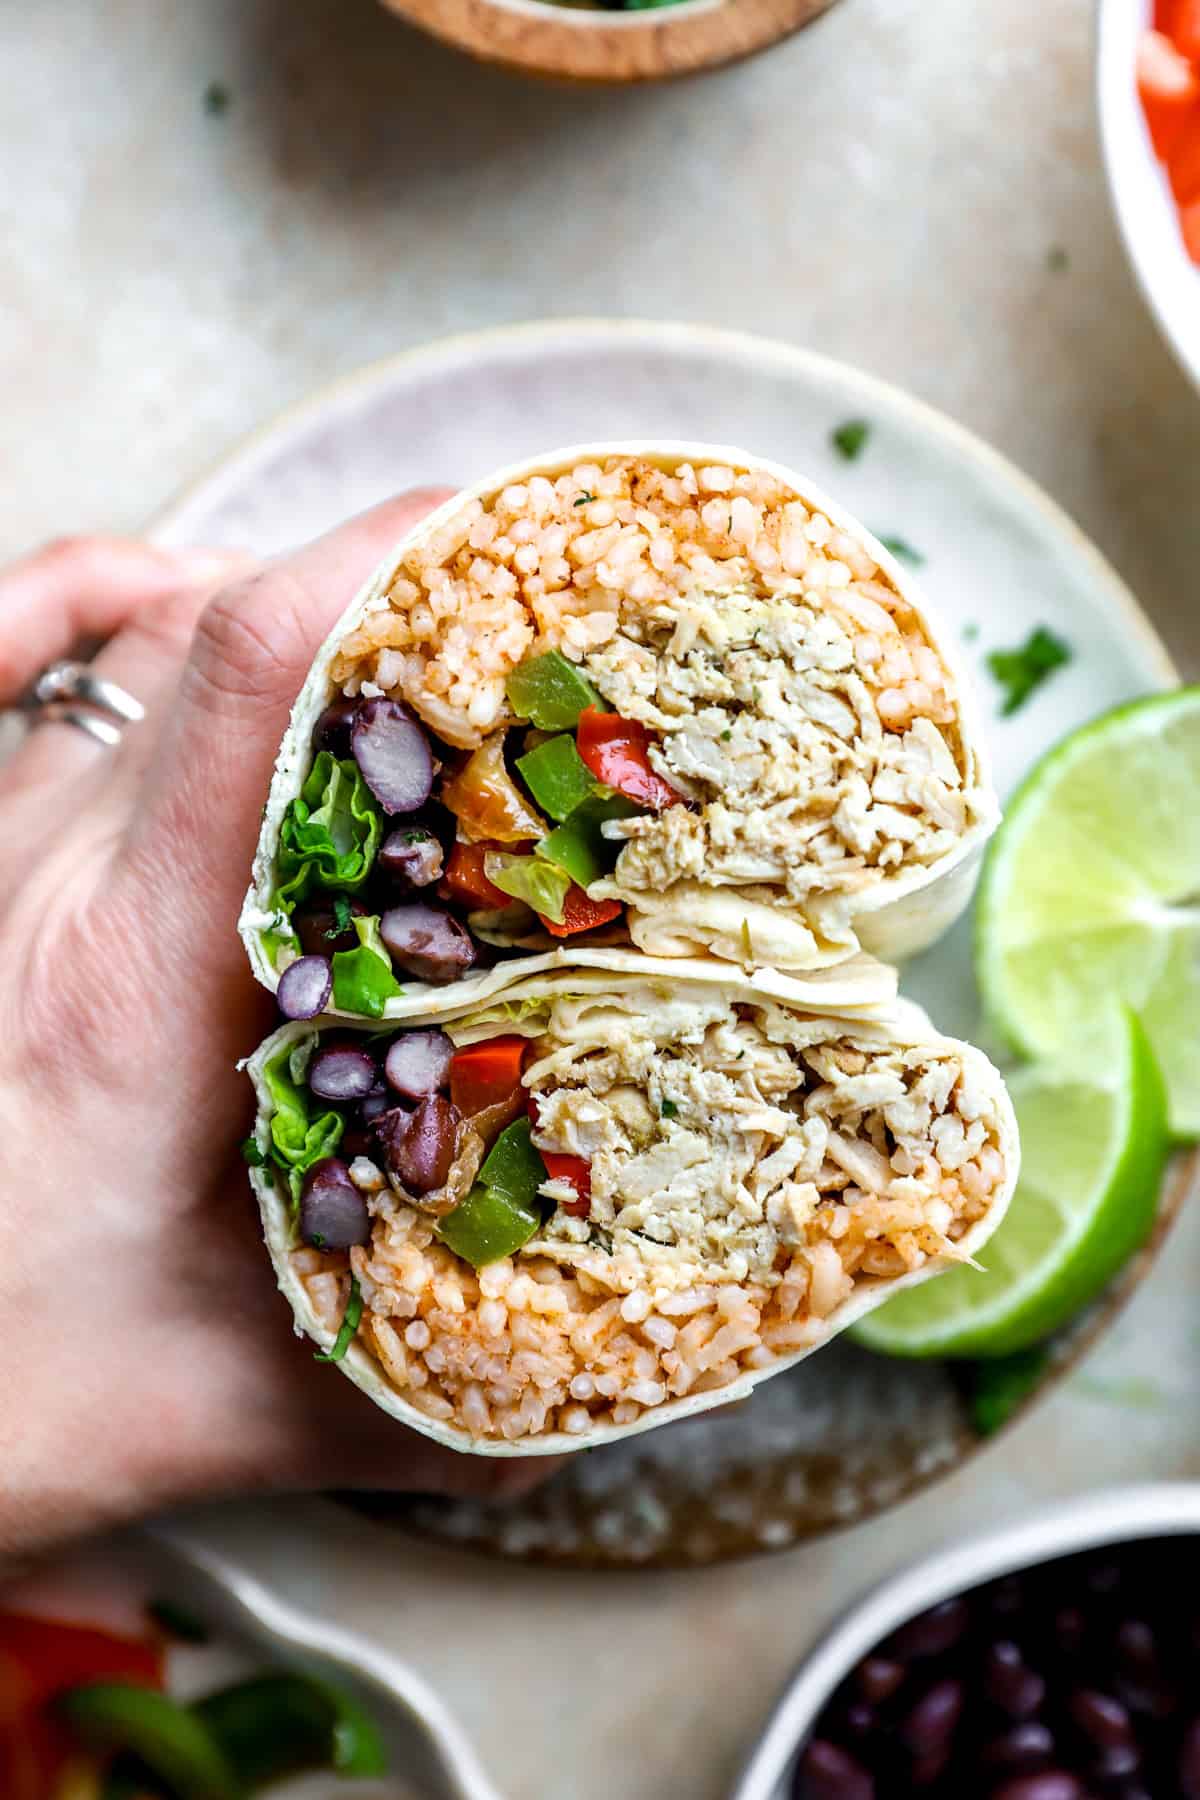
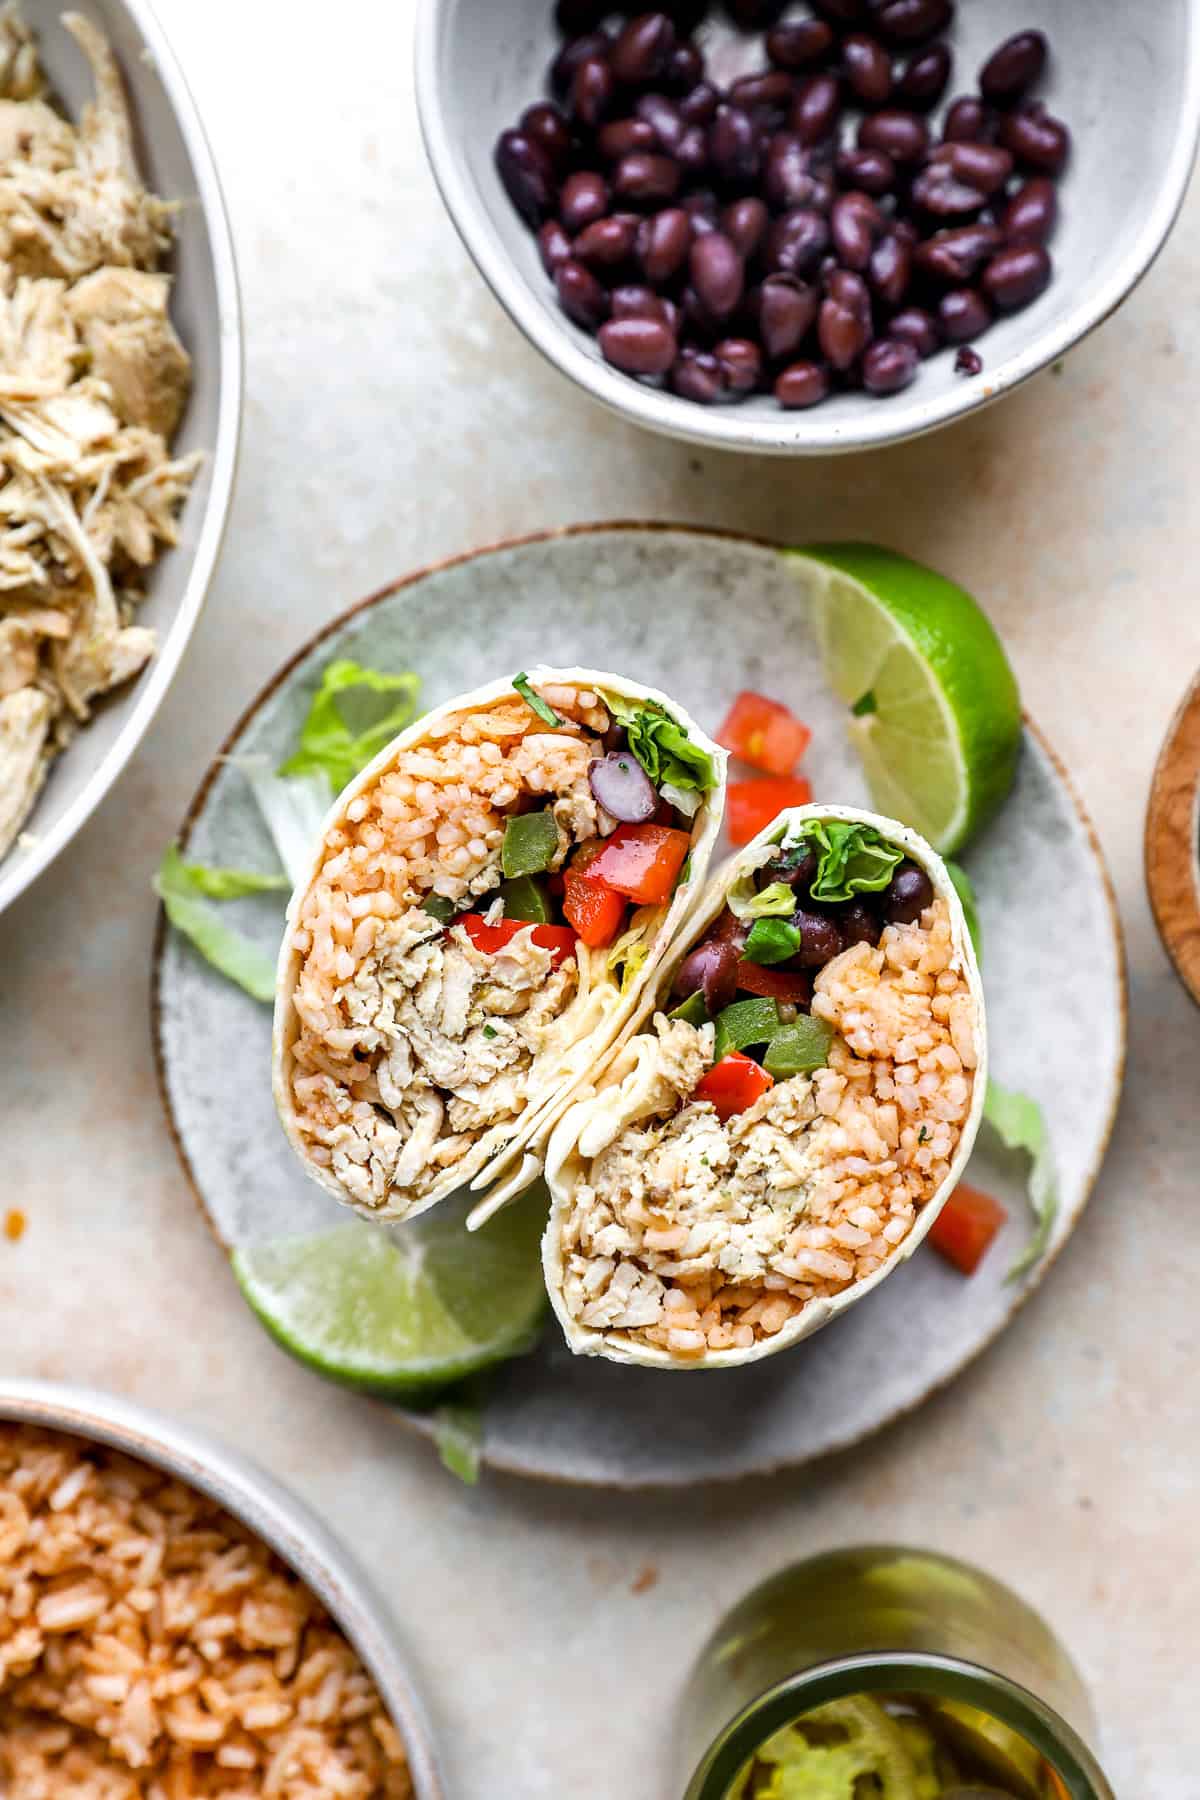
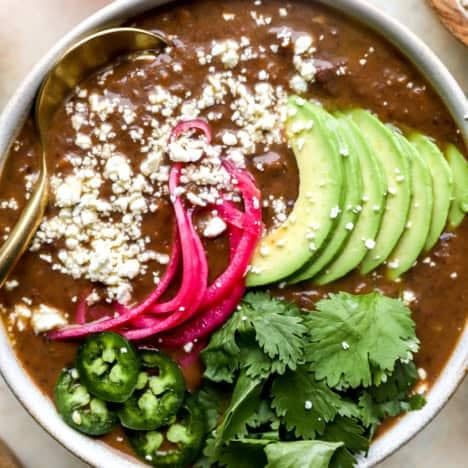
- Toppings: I use shredded romaine lettuce, diced tomato, shredded cheddar cheese, pickled jalapeños, diced avocado, lime, fresh cilantro, and salsa. I don’t freeze these ingredients!
- Black Beans: Be sure to drain and rinse the black beans first. Try these Costa Rica-Style Black Beans as an option.
Where I Buy My Beef & Chicken
- Wild-Caught Seafood
- 100% Grass-Fed, Grass-Finished Beef
- Free-Range Organic Chicken
- Humanely Raised Pork
Delivered to your door! The latest ButcherBox deal can be found right here.
Let’s Talk Tortillas!
You can use any tortilla you like for this recipe! Try homemade, flour, corn, gluten-free, etc. I’ve tested these with grain-free burrito-sized burritos, and they work if heated properly. If gluten isn’t an issue or you’re making for someone’s freezer, go for regular flour tortillas (if they can have gluten).
When it comes to making burritos, size does matter! A bigger tortilla will hold up better with the fillings. We want it to be sturdy and fully wrapped so the burrito can hold its shape.
I use 10-12” tortillas, and they work great!
How to Make Frozen Burritos
These frozen burritos look a lot more labor-intensive than they actually are! All you need is roughly 30 minutes of hands-on time to assemble them.
Prep the Fillings
- Make the rice: Place all of the ingredients into the instant pot and cook on manual pressure for 5 minutes. Release the pressure, then fluff with a fork. You can make this the day before.
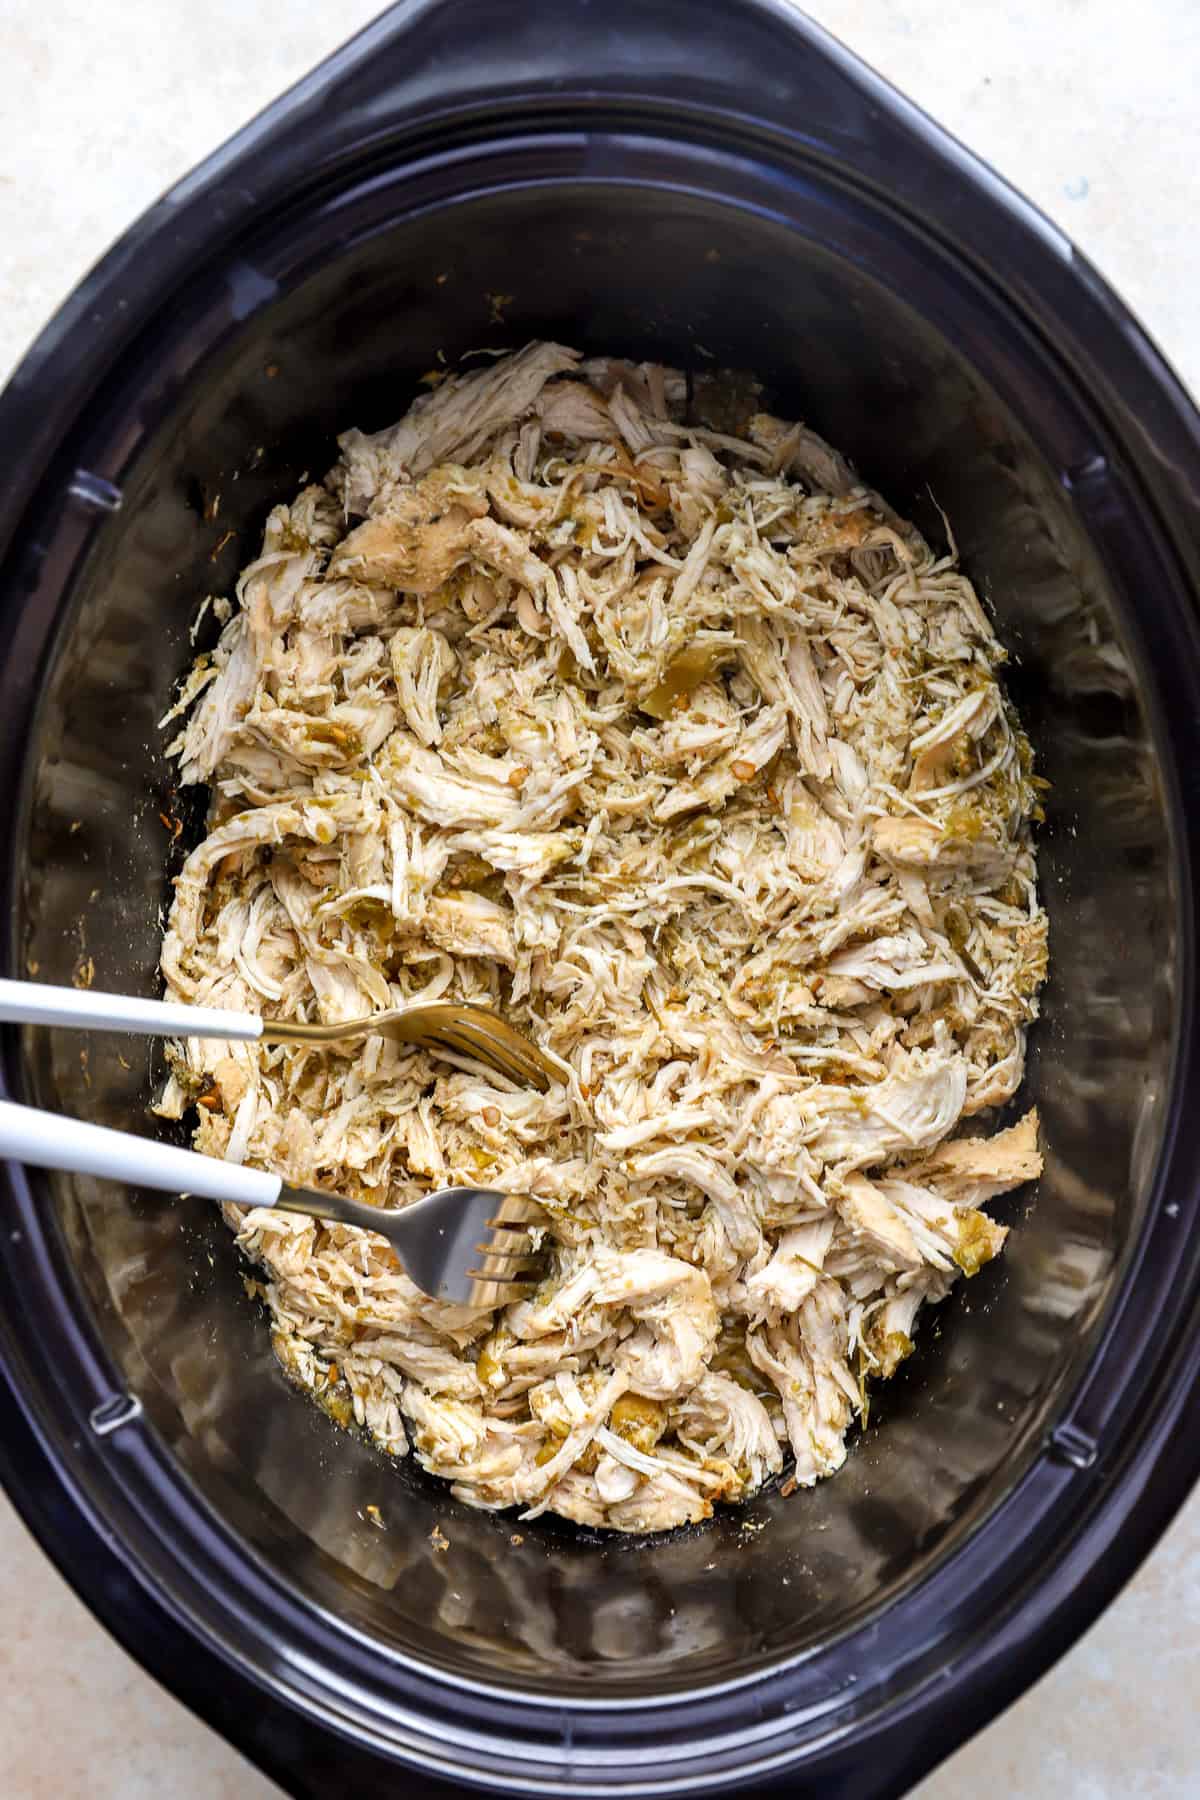
- Make the salsa chicken: Pat the chicken dry and season it with salt and pepper. Place into the slow cooker or Instant Pot with your salsa. Cook, shred, and set aside. You can make this the day before.
- Cook the meat: Combine the meat, oil, seasonings, and salsa in a skillet and cook until no pink remains. Set aside. You can make this the day before.
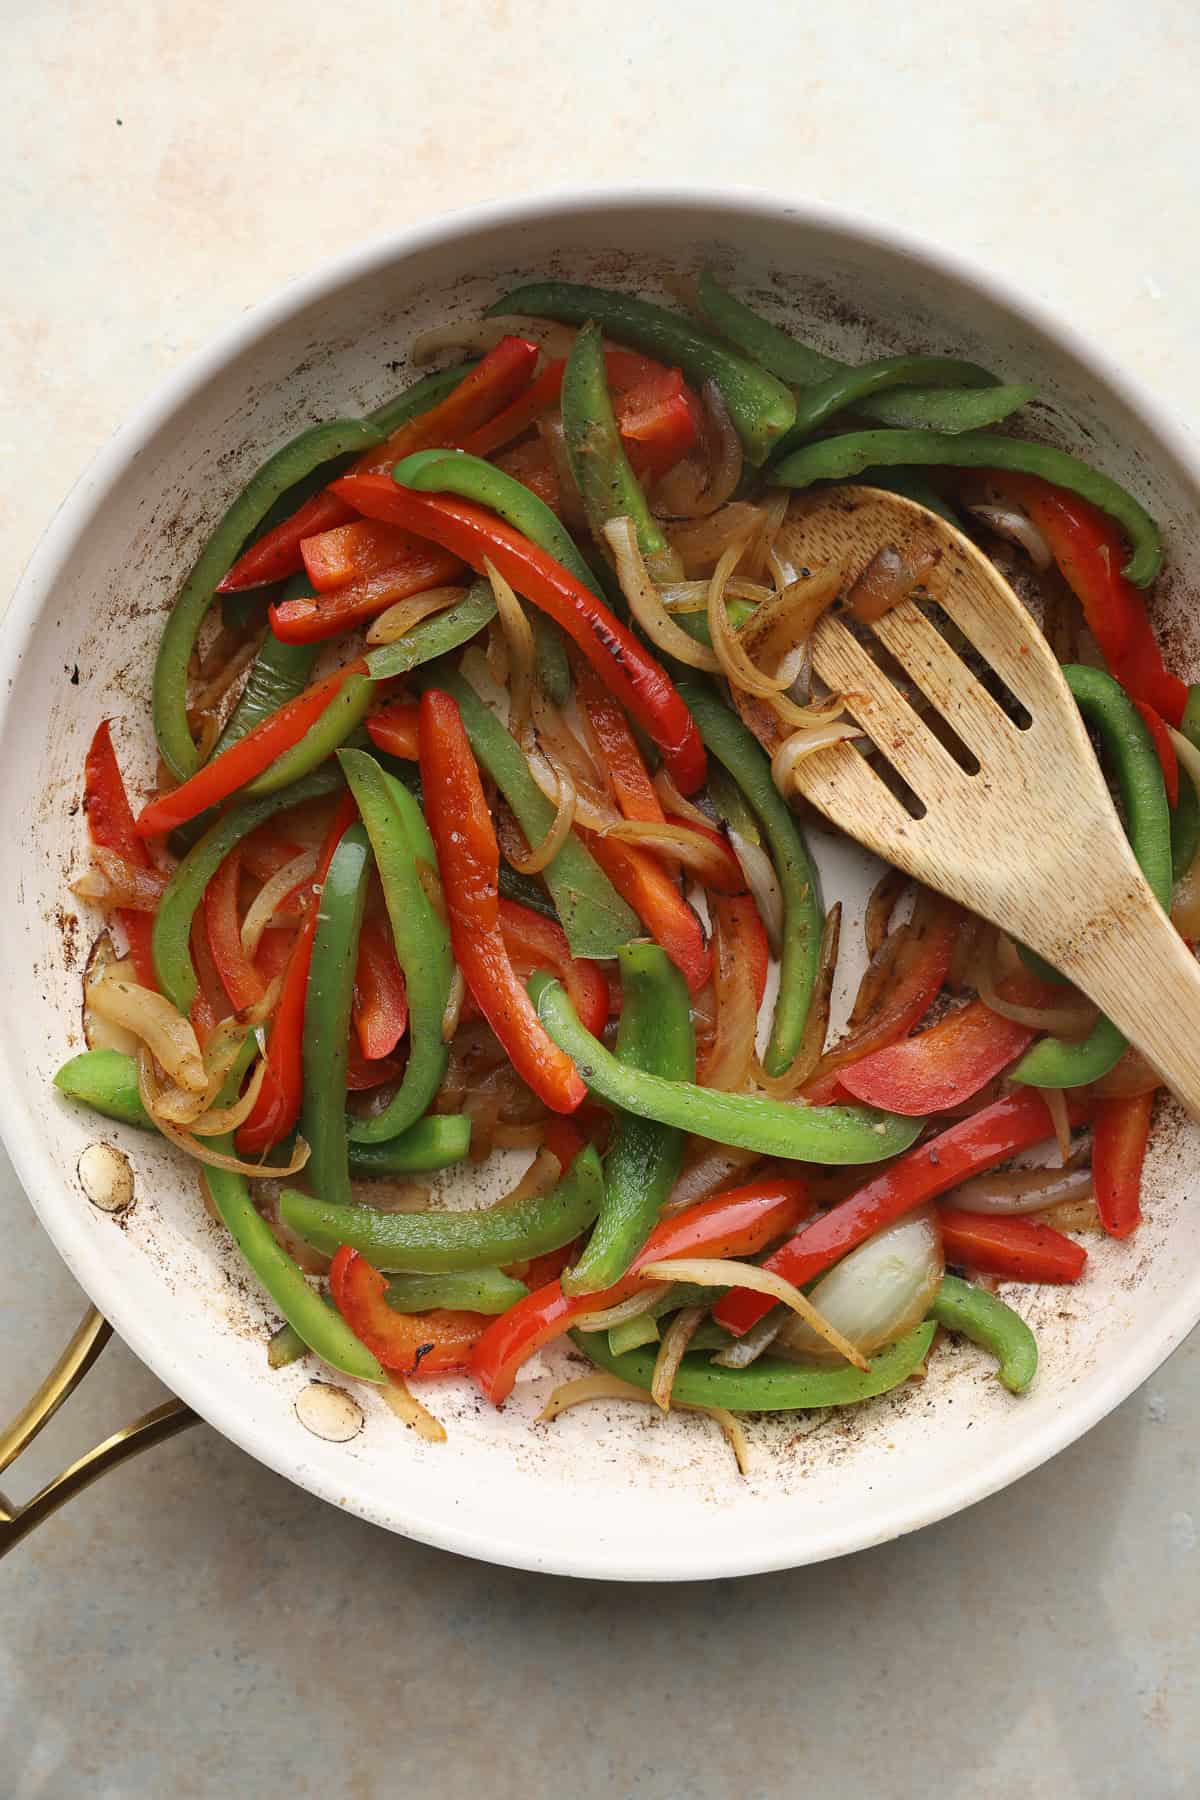
- Sauté the veggies: Heat oil in a skillet, then add the onions, peppers, salt, and pepper. Cook until soft.
Assemble the Burritos
- Warm your tortillas: In a skillet over medium heat, warm them for a few seconds on each side until warm. In the microwave, wrap a stack of tortillas in damp paper towels or a damp kitchen towel and microwave for 15-30 seconds, or until warm.
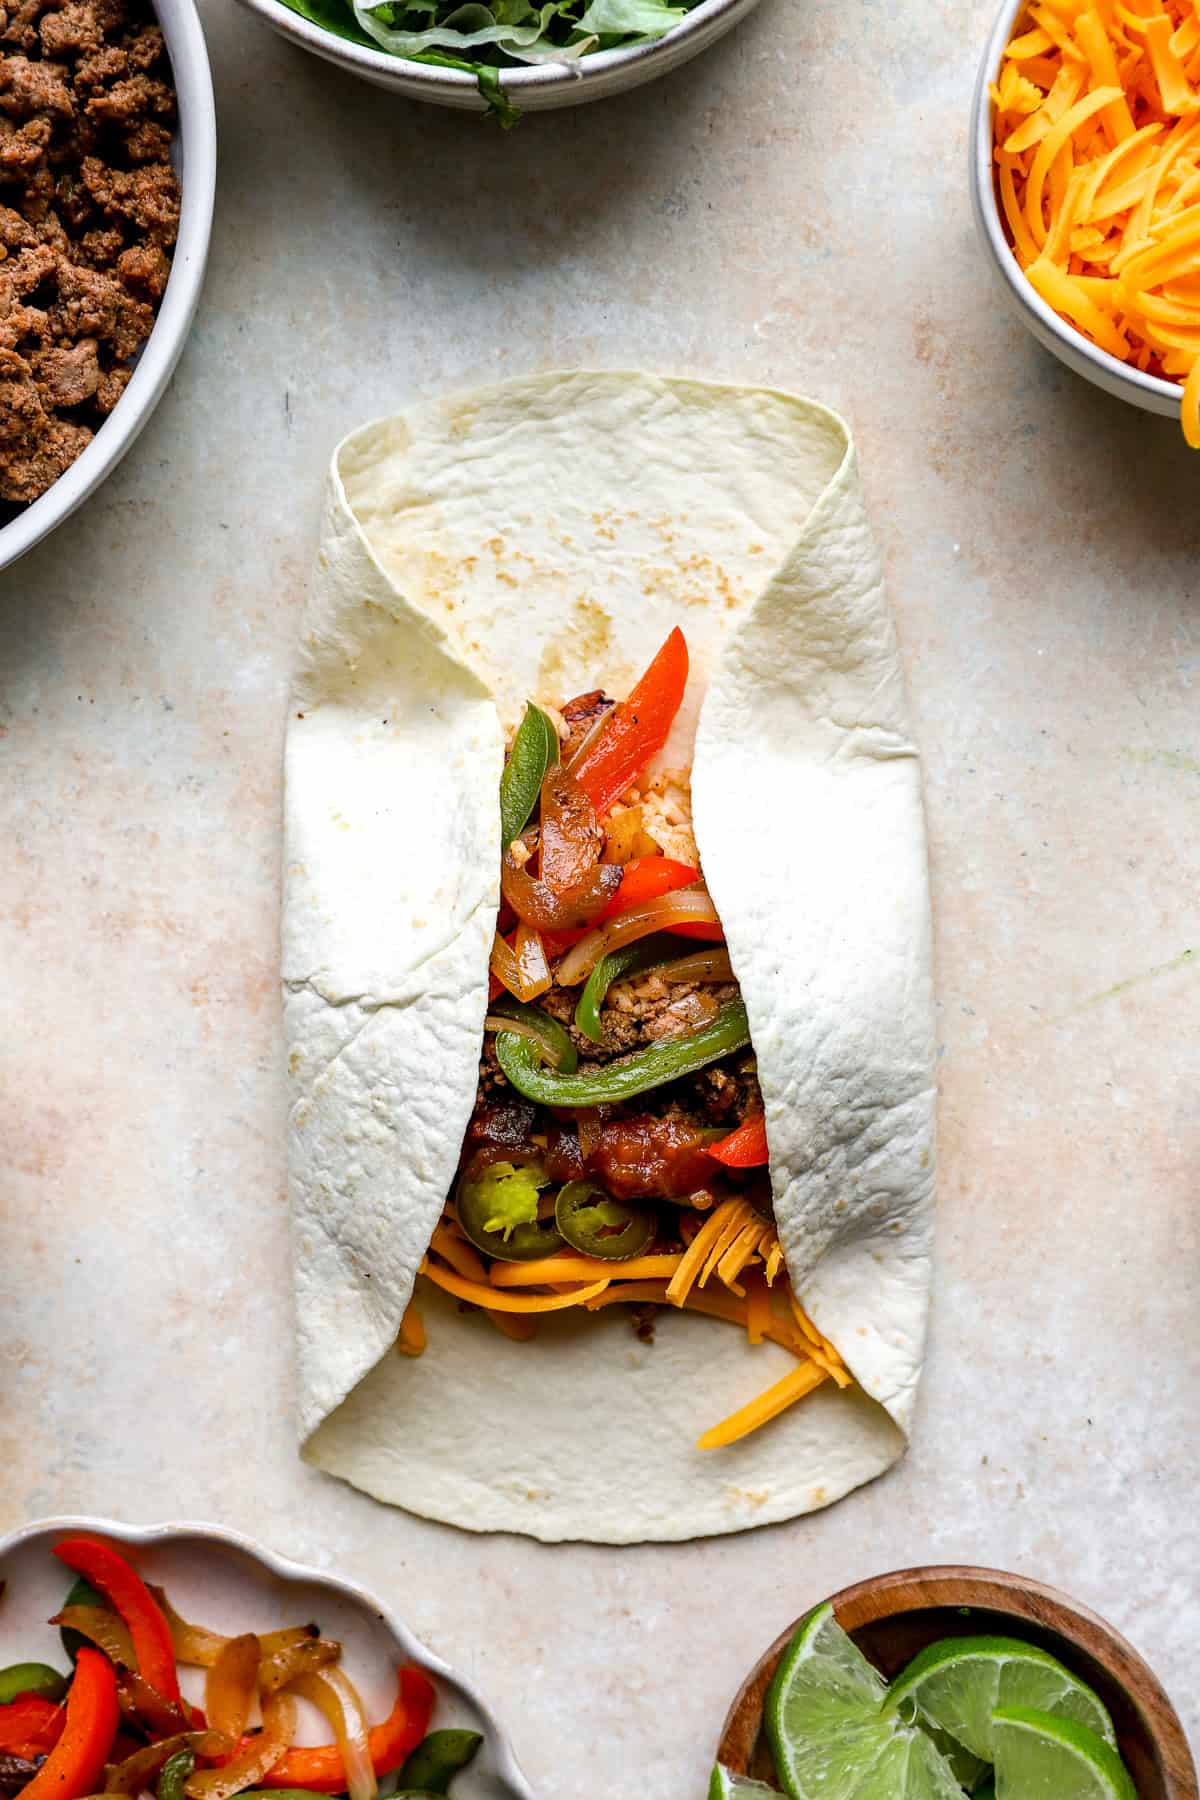
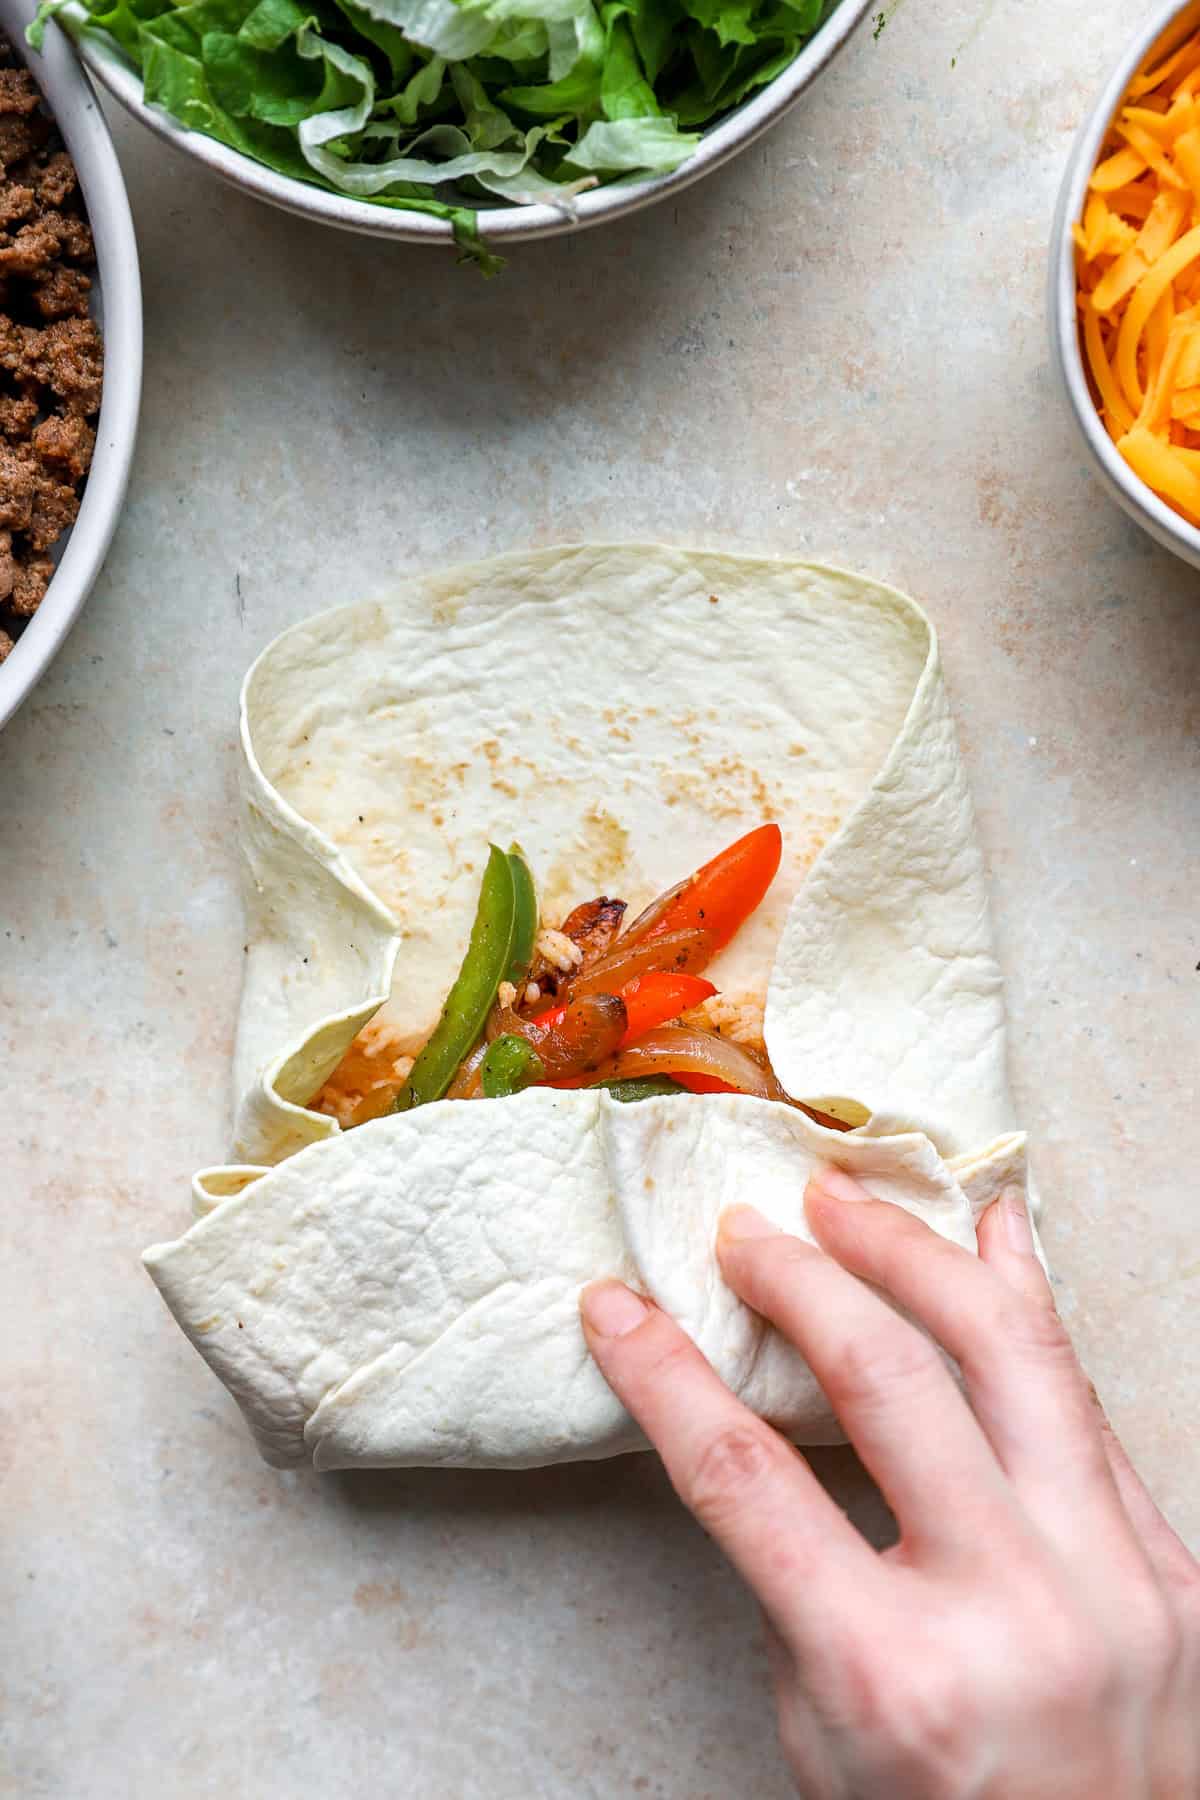
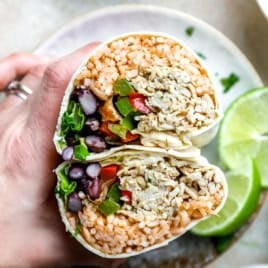
- Fill the burrito: Place a scoop of rice in your desired tortilla, then add chicken or taco meat, along with any other mix-ins you like.
- Roll the burrito: Fold in the sides of the tortilla, then roll it tightly.
- Serve or store: Serve right away, or flash-freeze until hardened, then store in a zip-top bag for up to 3 months.
How to Fold a Burrito
Once you have a warmed and filled burrito, follow these steps:
Fold in the left and right sides of the tortilla first, then wrap it from the bottom, using your fingers or a spoon to keep the filling inside the burrito.
Wet your finger and rub a little bit of water on the edge of the tortilla to seal it.
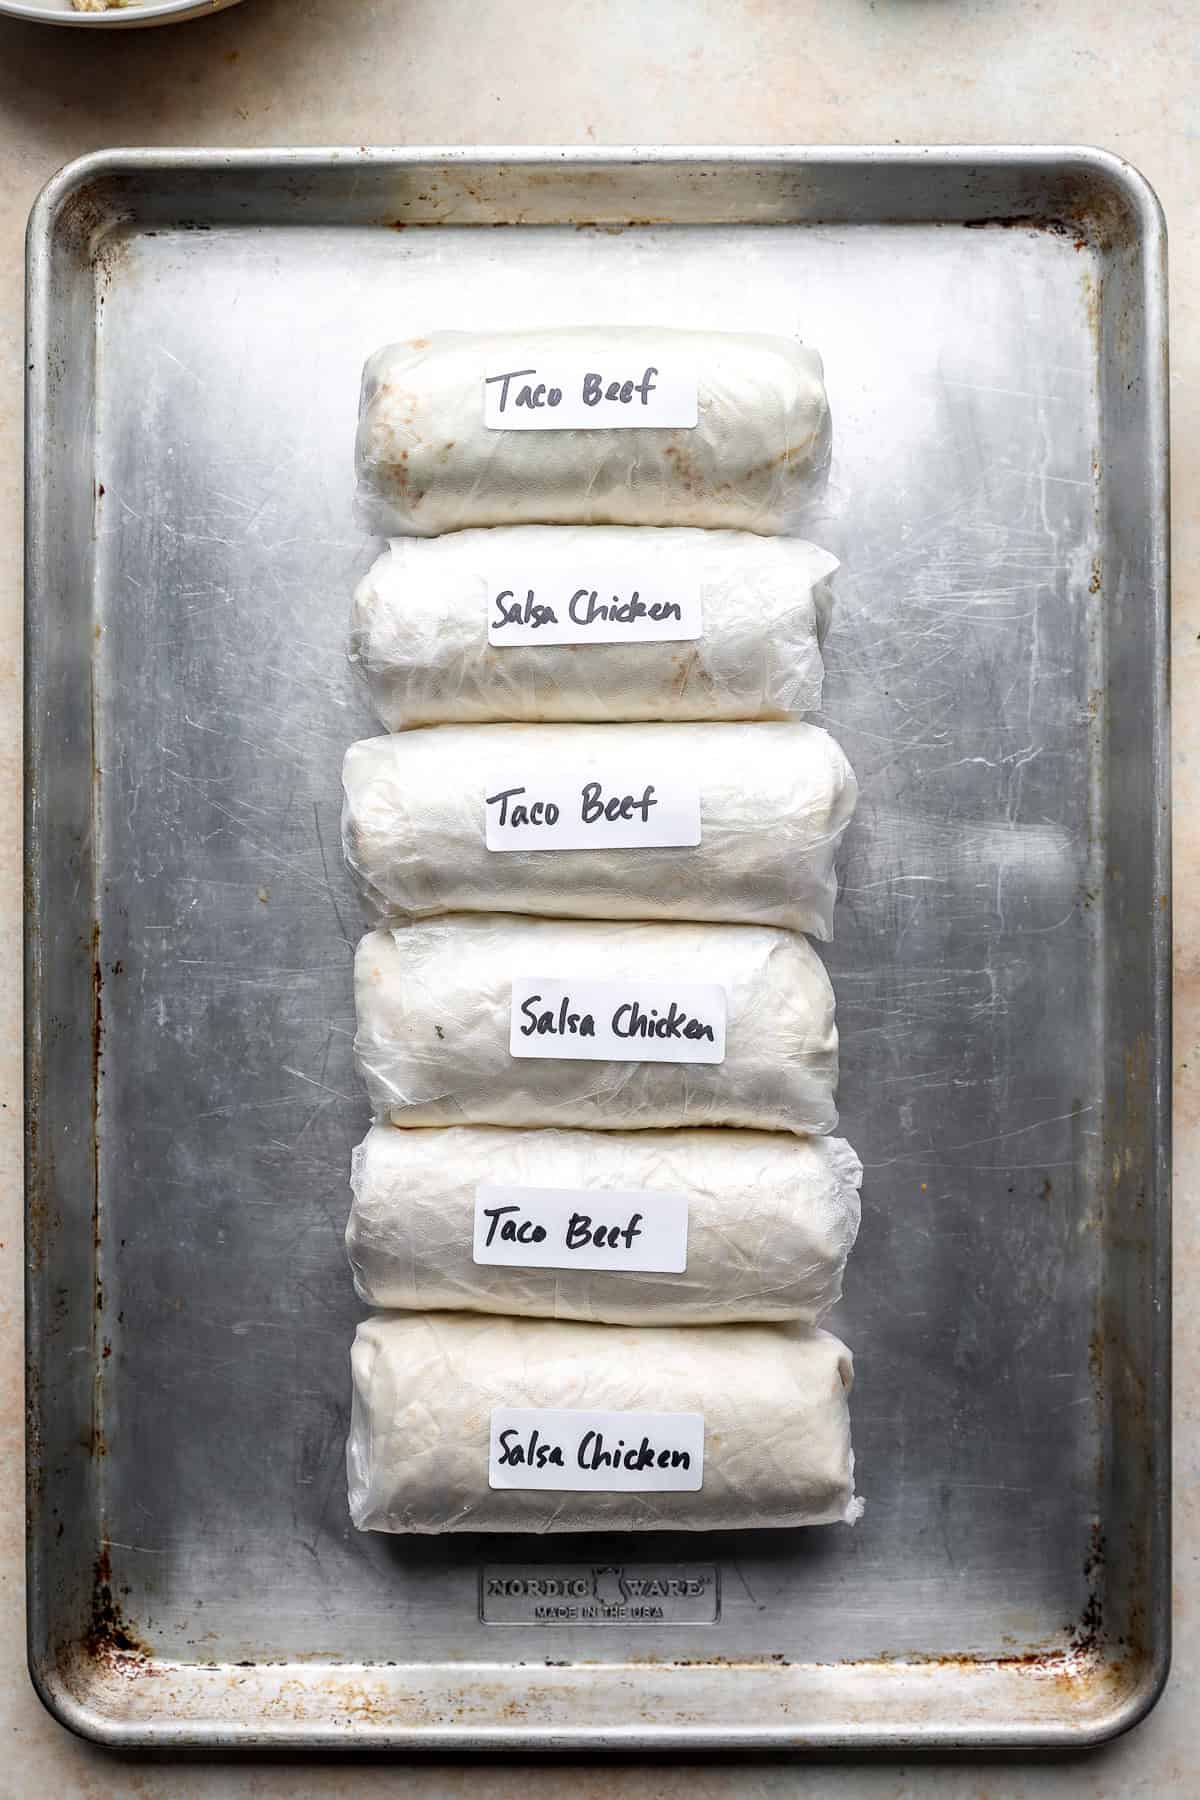
If wrapping to freeze: Lay out your foil, wax paper, or plastic wrap in a diagonal. Fold over the foil, plastic wrap, or wax paper underneath to wrap it tightly, then label and store!
Wrapping Burritos For The Freezeer
These freezer burritos are the perfect way to plan ahead and keep quick and easy meals on hand all the time! Here are a few of my best tips for storing freezer burritos!
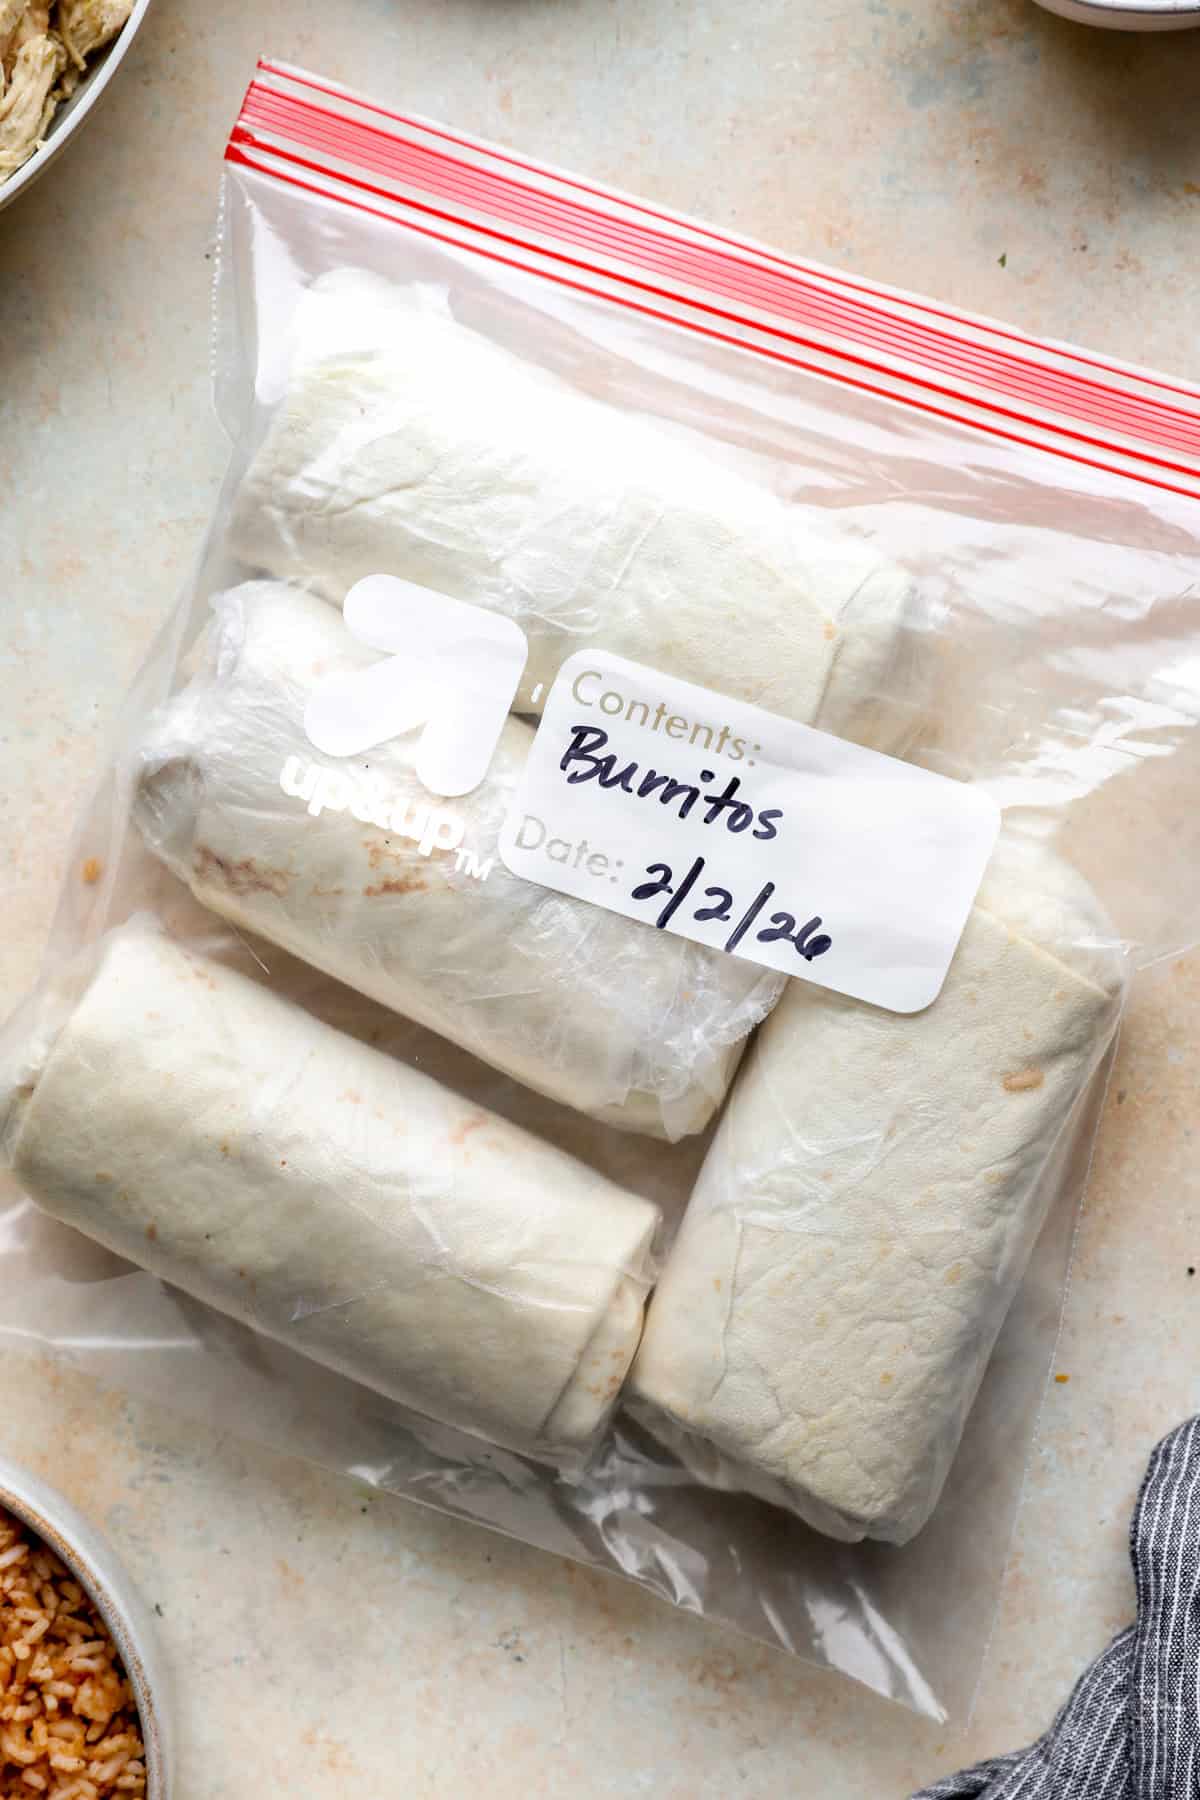
- Wrap individually. I wrap each burrito up individually in plastic wrap, wax paper, or foil. This makes it easy to grab one or two at a time for reheating.
- Roll diagonally. The easiest way for me to wrap up a burrito is to fold it in foil diagonally. This makes it super easy to wrap and unwrap.
- Flash freeze. Freeze the burritos on a sheet pan until solid, then store them together.
- Store in bags. Once the burritos are frozen, transfer them to a larger ziplock bag for longer storage.
- Label. Date the bags, so you know when the burritos were made. This makes it so much easier to keep track of how long they’ve been in the freezer.
What to Avoid if Freezing Burritos
While there are so many ingredients that are fair game for freezer burritos, there are a couple of ingredients you should avoid:
- Avocado: It just doesn’t freeze well. Instead, serve your reheated burrito with sliced avocado or guacamole!
- Dairy: Cheese is fine, but I definitely don’t recommend other dairy ingredients, like sour cream. These ingredients become watery when thawed.
- Watery ingredients: Anything that’s more liquid than solid, like salsa, lettuce, and raw tomato, should be avoided in the freezer. Again, they get too watery when thawed, which can cause texture issues and make the burritos overall soggy.
How to Reheat Frozen Burritos
Microwave: To reheat your frozen burritos, unwrap them and place them seam side down on a microwave-safe plate. Microwave for 2-4 minutes or until they’re heated all the way through.
Oven or Toaster: Alternatively, place the burritos in a toaster oven and bake at 375°F for 20 minutes, or until heated through.
Air Fryer: Preheat your Air Fryer to 375°F. Place frozen burritos into the air fryer. Air-fry for 20 minutes, flipping every 5 minutes. Gently transfer to a plate, top with your favorite topping,s and enjoy!
FAQ’s
Cool the filling slightly. If the filling is too hot when you add it to the burrito, it can make the tortillas soggy.
Pre-cook the veggies. Veggies release a lot of moisture as they cook. If you pre-cook the veggies, you can remove any excess moisture before adding them to the tortilla.
Drain excess grease. After you cook the ground beef, drain off any excess grease before adding it to the tortilla. The oil can make the tortilla soggy.
Go easy on ingredients with high water content. While we’re using salsa in the filling, be sparing if you add any extra salsa or sauce to the burritos. Too much can soften the tortillas.
Add once you’ve reheated the burrito, this will give ultimate freshness!
When the burritos have been flash-frozen and stored properly, they’ll last in a freezer bag for up to 3 months.
Up to 4 days, stored in an airtight container or tightly wrapped.
Serving Suggestions
These burritos are great on their own, but can also be served as part of a larger sit-down meal. I recommend serving them with salsa, guacamole, and hot sauce.
Try serving them with a side of Easy Homemade Refried Beans, Coleslaw, Mexican street corn salad, Guacamole, Blender Salsa or Avocado Corn Salsa, Costa Rice-Style Black Beans, or even some Roasted Sweet Potatoes seasoned with taco seasoning.
You can also make them into burrito bowls! Layer everything in an airtight container.
More Meal Prep Recipes You’ll Love
- Paleo Asian Beef and “Rice” Meal Prep
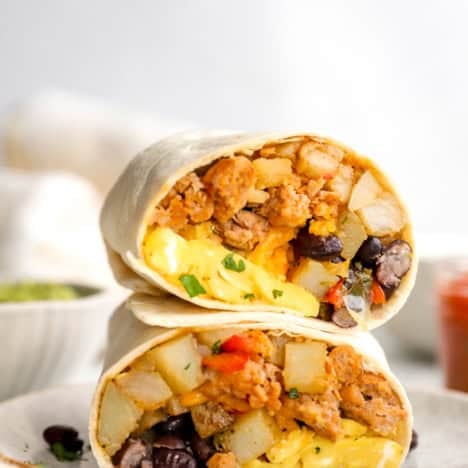
- Breakfast Burritos
- 8 Budget-Friendly Lunches
- Budget Friendly Smoothie Packs
- Breakfast Prep Baked Egg Cup
- Thai Turkey Bowl
- Freezer Breakfast Sandwiches
Watch The Video:
Meal Prep Freezer Burritos
Ingredients
For Salsa Chicken:
- 1 pound boneless skinless chicken breast
- 1-8 ounce jar salsa verde
For Mexican Rice:
- 2 cups jasmine or long grain rice
- 2 cups water
- 1 tablespoon tomato paste
- 1/2 teaspoon onion powder
- 1/2 teaspoon garlic powder more to taste
- 1/2 teaspoon cumin
- 1 teaspoon paprika
- 1/4 teaspoon cayenne powder
- 1/2 teaspoon sea salt more to taste
- 1/2 teaspoon black pepper more to taste
For Taco Meat:
- 1 pound grass-fed ground beef
- 1 tablespoon oil of choice
- 1 teaspoon paprika
- 1 teaspoon chili powder
- 1 teaspoon garlic powder
- 1 teaspoon onion powder
- 1/2 teaspoon fine sea salt
- 1/4 teaspoon black pepper
- 1/4 teaspoon dried oregano
- 3 tablespoons salsa you can use salsa verde as well
- Optional: 1/2 teaspoon cayenne powder
For Veggies:
- 2 teaspoons avocado oil more if needed
- 1 red pepper sliced
- 1 green pepper sliced
- 1 white onion sliced
- 1/2 teaspoon sea salt
- 1/2 teaspoon black pepper
To Assemble:
- 8-10 homemade tortillas corn tortillas, flour tortillas (if making for non-gluten-free friends), or my favorite Siete tortillas (Siete tortillas are gluten-free and paleo-friendly!)
- 1-2 cups romaine lettuce shredded
- 2 roma tomatoes diced
- 1 cup shredded cheddar cheese or cheese of choice
- 1/3 cup pickled jalapenos
- 1 avocado diced
- 1-14.5 ounce can black beans drained and rinsed
- 1 lime cut into wedges
- 1 cup salsa of choice
- Fresh cilantro
Instructions
Make the Instant Pot or Slow Cooker Salsa Chicken:
- Pat chicken dry and season with salt and pepper. Place in a slow cooker and add 2 cups of salsa verde, or just enough to coat the chicken. Set slow cooker to 4 hours on high (or Instant Pot for 18 minutes). Shred and set aside.
Make the Rice:
- Place all ingredients in your instant pot. Secure the lid and using the "MANUAL" setting, set the Instant Pot to 5 minutes on high pressure.
- Once five minutes is complete, let the Instant Pot slowly release pressure for at least 10 minutes. Turn the valve to release the remaining pressure after 10 minutes. Slowly take off the lid and fluff with a fork. Taste and adjust seasoning as desired. *If you do not have an Instant Pot, check below for stove-top directions!
Make the Taco Meat:
- Heat oil in medium skillet over medium heat, and add beef, spices, and salsa. Sauté until all of the meat is cooked and no pink remains. Taste and adjust seasoning as desired.
Make the Sautéed Peppers and Onions:
- Add oil to a medium skillet over medium-high heat. Once oil is hot, add in peppers, onions, salt and pepper. Let cook until peppers are soft and onions are translucent. Set aside in a bowl until ready to assemble.
Assemble:
- Place rice on the desired tortilla. Add either chicken or taco meat and any other add-ins you want!
- Fold in the sides, and then roll.
- Either serve right away or wrap individually in plastic wrap or aluminum foil tightly. Let freeze individually on a sheet tray, and once frozen place in a bag for long term storage, up to 3 months. These will keep in the freezer for up to 2 months!
To Reheat:
- Microwave: To reheat your frozen burritos, unwrap them and place them seam side down on a microwave-safe plate. Microwave for 2-4 minutes or until they’re heated all the way through.
- Oven or Toaster: Alternatively, place the burritos in a toaster oven and bake at 375ºF for 20 minutes or until heated all the way through.
- Air Fryer: Preheat your Air Fryer to 400°F. Place frozen burritos into the air fryer. Air Fry for 15 minutes, flipp every 5 minutes.Gently transfer to a plate, top with your favorite toppings and enjoy!
Notes
- Mexican Style Rice on the Stovetop: Place 2 cups of rice, 2 cups of water and sea salt in a saucepan. Cover and bring to a boil over high heat. Turn down heat and simmer on low until all of the water has dissolved. Add in the rest of the ingredients and mix well. Taste before setting aside until ready to assemble! Store the rest of the rice in a airtight container in the refrigerator for 4-6 days. Rice should be discarded if left at room temperature for more than 2 hours.
- Tortillas: I use 10-12” tortillas and they work great! I’ve tested these with grain-free burrito size burritos and they work if heated properly. If gluten isn’t an issue or you’re making for someone’s freezer, go for whole wheat or regular flour tortillas. Warming your tortillas for rolling: In a skillet: Heat a skillet over medium heat, and warm your tortillas for a few seconds on each side until warm. In the microwave: Wrap a stack of tortillas in damp paper towels or a damp kitchen towel and microwave for 15-30 seconds, or until warm.
- Reheating:
-
- Frozen Burrito in Microwave: To reheat your frozen burritos, unwrap them and place them seam side down on a microwave-safe plate. Microwave for 2-4 minutes or until they’re heated all the way through.
- Frozen Burrito in Oven or Toaster: Alternatively, place the burritos in a toaster oven and bake at 375ºF for 20 minutes or until heated all the way through.
- Frozen Burrito in Air Fryer: Preheat your Air Fryer to 375°F. Place frozen burritos into the air fryer. Air Fry for 20minutes, flip every 5 minutes.Gently transfer to a plate, top with your favorite toppings and enjoy!
-
-
What to Avoid in a Burrito Recipe if Freezing: While there are so many ingredients that are fair game for freezer burritos, there are a couple of ingredients you should avoid:
- Avocado. It just doesn’t freeze well. Instead, serve your reheated burrito with sliced avocado or guacamole!
- Dairy. Cheese is fine, but I definitely don’t recommend other dairy ingredients like sour cream. They become watery when thawed and can cause your burrito to be soggy.
- Watery ingredients. Anything that’s more liquid than solid, like salsa, guacamole, lettuce, and raw tomato, should be avoided in the freezer. Again, they get too watery when


These are so so good! I made them for postpartum and they’re nourishing and easy to eat with one hand. So versatile too! Thank you!
Very delicious
Very nice to have and great food for the emergency I don’t have dinner evenings! Pick some mature cheddar to add even more taste and you are golden!
We love these freezer burritos! We make them whenever we know we have a busy season coming up. It’s a bit of effort, but it’s been great to have healthy, delicious food ready for a quick meal in the freezer!
Hey Lexi,
I was just wondering what the nutrition breakdown for you meal prep burritos would be
Thank you kindly,
Mishqa
When freezing- do you add avocado or wait until the day you want to eat at them to add it after reheating?
I have the same questions as Danielle above!
When reheating, are you doing so from frozen? Or thawed then heat?
Such a cool idea! Love these Lexi 🙂
Thank you!!
I think you just made my week! My husband loves burritos! I gotta try this for his lunch! YUM!
YES — And freeze for those nights you don’t want to cook!
Love me some freezer recipes–they’re SO easy!
YES!!!
We make these at our house too!
The best!
So customizable! This would be perfect for a busy night.
What a great idea- I should do this for my kids for school lunches!
Do you freeze them with the lettuce and tomato on them, and it turns out okay?
I personally do and have found it totally fine 🙂
i JUST did freezer breakfast burritos for the freezer last week! how do you like to reheat yours?